อยากรู้วิธีการเขียนโค้ด ตั้งค่าอุณหภูมิ และความชื้น DHT 21 ด้วยการตั้งค่าสไลด์บาร์ หรือกล่องใส่ค่าตัวเลข ในแอป blynk ว่าจะเขียนโค้ดใน node mcu อย่างไร ขอตัวอย่างด้วยครับ
ใช้คำสั่งนี้ครับ
การกำหนดค่าให้ Slider
Blynk.virtualWrite(V1, 55);
การตั้งชื่อให้ Slider
Blynk.setProperty(V1, "label", "My Slider Label");
กำหนดสีหรือเปลี่ยนสีให้ Slider
กำหนดให้เป็นสีแดง #D3435C
Blynk.setProperty(V1, "color", "#D3435C");
ขอบคุณครับที่ช่วยตอบให้ ความต้องการของผมคือ ตั้งค่าอุณหภูมิโดยการใช้กล่องตัวเลข หรือวไลด์บาร์ครับ แต่ผมไม่รู้ว่าเวลาเขาเขียนคำสั่งในตัวmcu ต้องใช้คำสั่งเปรียบเทียบค่างอย่างไรครับ ผมสังรูปที่ออกแบบแอปมาให้ดูด้วย พยายามหาในเน็ต ในยูทูปก็ไม่มีสอนในส่วนนี้เลยครับ Tmin<v4 relay1 on . Tmax>v4 ให้รีเลย์ 1off เราจะเขียนโค้ตรับค่าจาก V
21,V22มาทีเทียบกับv4 อย่างไรครับ ผมมือใหม่ครับแต่อยากศึกษาครับ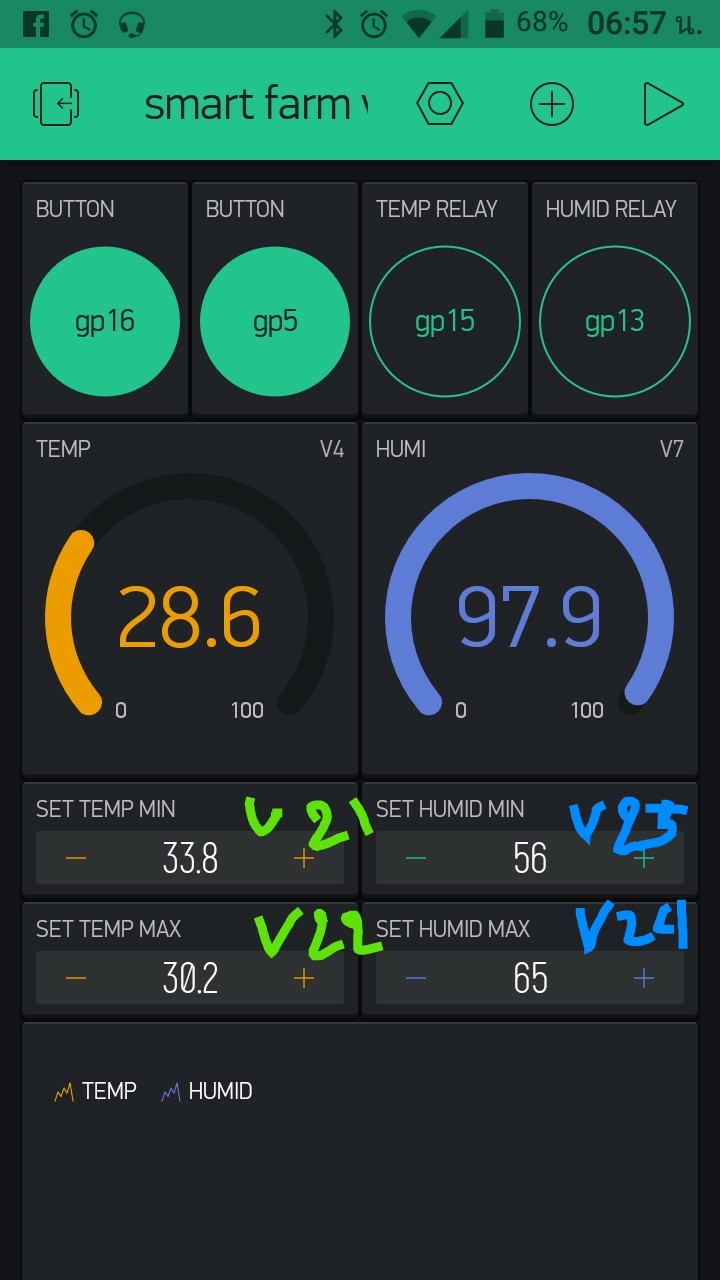
ขอบคุณล่วงหน้าครับ
ตอนนี้เขียนแบบไหนต้องลองเอาโค้ตมาดูกันครับ ได้เขียนเทียบกันไว้แล้วหรือยัง
1 Likes
โค้ดประมานนี้ครับ

#define BLYNK_PRINT Serial
//#define LDR       A0
#define LED       D4      //GPIO2
#define red_LED   D8      //GPIO15 Temp Relay
#define blue_LED  D7      //GPIO13 Humid Relay
#define green_LED D6      //GPIO12
#define DHTPIN    D5
#define DHTTYPE   DHT21  // DHT 11, 21
#define measurePin A0     // LDR
#define Tmin      V21
#define Tmax      V22
#define Hmin      V23
#define Hmax      V24
#include <ESP8266WiFi.h>
#include <BlynkSimpleEsp8266.h>
#include "DHT.h"

char server[] = "oasiskit.com";
int port = 8080;
char auth[] = "2ede26e45d1a416c9e0ee98aaxxxxxxx";
char* ssid[] = {"intel farm AP2","CIS HOME 2", "intel ",};   //Array containing any wifi networks the device can use
char* pass[] = {"intelwifi009","CIS9629651", "intelwifi009",};   //Array containing associated wifi passwords
int i, w = 0;
int wifi_timeout = 10;    //Timeout for each connection attempt (seconds)
#define SSID_COUNT (sizeof(ssid)/sizeof(ssid[0]))  //Determines the number of SSIDs in ssid[] array
int counter, voMeasured;

BlynkTimer timer;
DHT dht(DHTPIN, DHTTYPE);

void setup() {
  pinMode(LED, OUTPUT);
  pinMode(red_LED, OUTPUT);
  pinMode(blue_LED, OUTPUT);
  pinMode(green_LED, OUTPUT);
  pinMode(measurePin, INPUT);
  Serial.begin(9600);
  dht.begin();
  counter = 10;

  initWifi_noLCD();
  Blynk.begin(auth, ssid[w], pass[w], server, port);
  timer.setInterval(5000L, sendSensor);

  LED_blink();
}

void loop() {
  Blynk.run();
  timer.run();
}

void sendSensor() {
  delay(1000);
  float h = dht.readHumidity();
  //if use byte h, t can display gauge on blynk but some 255
  float t = dht.readTemperature();
  if (isnan(h) || isnan(t)) {
    Serial.println("Failed to read from DHT sensor!");
    return;
  }
  voMeasured = analogRead(measurePin);

  if (counter < 10) {
    counter++;
  } else {
    counter = 0;
  }
  Serial.print("Count: ");
  Serial.print(counter);
  Serial.print("\t");
  Serial.print("Temp: ");
  Serial.print(t);
  Serial.print(" *C\t");
  Serial.print("LDR: ");
  Serial.println(voMeasured);

  //Blynk.virtualWrite(V1, red_LED);
  //Blynk.virtualWrite(V2, blue_LED);
  //Blynk.virtualWrite(V3, green_LED);
  Blynk.virtualWrite(V4, t);
  Blynk.virtualWrite(V7, h);
  Blynk.virtualWrite(V5, voMeasured);
  Blynk.virtualWrite(V6, counter);
  //Blynk.virtualWrite(D4, LED);
  LED_blink();
}

void initWifi_noLCD() {
  //connect multiplt ssid
  Serial.flush();
  Serial.println("Searching available ssid...");
  Serial.print(ssid[w]);
  WiFi.begin(ssid[w], pass[w]);

  while (WiFi.status() != WL_CONNECTED) {
    //If timeout is reached, increment w counter, try the next wifi network
    if (i == wifi_timeout) {
      Serial.println("");
      w++;
      //Make sure we havent reached the end of the list of SSIDs
      if (w < SSID_COUNT) {
        Serial.print("Switching to alternate SSID...");
        Serial.println(w);
        WiFi.begin(ssid[w], pass[w]);
        Serial.print(ssid[w]);
        delay(1000);
      } else {
        //If we have tried all the defined SSIDs, reboot and try again, or change to break; and continue on with program
        Serial.println("No WiFi connection available, rebooting...");
        w = 0;
        //ESP.restart();
      }
      i = 0;
    } else {
      Serial.print(".");
      delay(1000);
    }
    i++;
  }
  if (WiFi.status() == WL_CONNECTED) {
    Serial.println("");
    Serial.print("Connected to: ");
    Serial.print(WiFi.SSID());
    Serial.print(", Signal: ");
    Serial.println(WiFi.RSSI());
    Serial.print("MAC address: ");
    Serial.println(WiFi.macAddress());
    Serial.print("IP address: ");
    Serial.println(WiFi.localIP());
  }
}


void LED_blink() {
  digitalWrite(LED, LOW);
  delay(50);
  digitalWrite(LED, HIGH);
}```ทำได้หรือยังครับ ผมใช้คำสั่งนี้ครับ ที่ Blynk ก็สร้าง สไลด์บาร์ เลือก V21 ( V อะไรก็ได้)
int Tmin ;
BLYNK_WRITE(V21) //ส่งค่าจาก Blynk หน้าจอมือถือ ไปที่ NodeMCU
{
Tmin = param.asInt();
}
3 Likes
ขอดูตัวอย่างที่เขียนด้วยครับ
1 Likes
ตอนนี้ทำไปถึงไหนแล้วครับ
1 Likes
ผลเป็นอย่างไรบ้างครับ
ผมเองก็รอดูครับจะได้เอาไปพัฒนาต่อ
แต่ยังปรับ Tmax ที่ app blynk แล้วส่งเข้าไปแก้ไขโปรแกรมที่เขียนไว้ใน node esp8266 เปลี่ยนตามไม่ได้เลย
รบกวนหน่อยครับ
1 Likes
ทำได้แล้วครับ
ขอบคุณมากครับ
สอนผมบ้างครับ ขอดูตัวอย่างโค้ดด้วยครับ
พี่ครับ ผมความรู้น้อยขอโค้ดโปรแกรมได้ไหมครับ สนใจอยากทำครับ ขอบคุณครับ
พี่ครับ ผมความรู้น้อยขอโค้ดโปรแกรมได้ไหมครับ สนใจอยากทำครับ ขอบคุณครับ
ไม่มีความรู้พื้นฐานเอาไปก็ใช้งานไม่เป็นอยู่ดีนะครับ สู่ซื้อสำเร็จมาใช้เลยดีกว่า
…แต่หากอยากได้ความรู้ที่นี้พร้อมเติมเต็มและช่วยเหลือและเรียนรู้ไปด้วยกันครับ
ต้องขอโทษพี่ Perpol Thanapunnamas และพี่ son ที่เข้าตอบช้าช่วงนี้งานยุ่งมากเลยครับ
code ที่ผมใช้ทั้งหมดตามด้านล่างครับ
ขออภัยอีกครั้งที่ตอบช้าครับ
#define BLYNK_PRINT Serial
#include <ESP8266WiFi.h>
#include <BlynkSimpleEsp8266.h>
#include <SimpleTimer.h>
#include <SimpleDHT.h>
#include <TimeLib.h>
#include <DHT.h>
#include <DHT_U.h>
#include <TridentTD_LineNotify.h> //thank you Mr.TridentTD https://github.com/TridentTD/TridentTD_LineNotify
#define DHTPIN 12 // กำหนดขาให้กับอุปกรณ์ตรวจสอบความชื้น DHT11
#define DHTTYPE DHT11
//////////////////////////////////////////จุดที่เพิ่ม

int setTemp;
int setHumid;

BLYNK_WRITE(V22) //temperature slider in app on pin V22
{
setTemp = param.asInt();
}
BLYNK_WRITE(V23) //temperature slider in app on pin V23
{
setHumid = param.asInt();
}

//////////////////////////////////////////

DHT_Unified dht(DHTPIN, DHTTYPE);

//* **BLYNK TOKEN** //
char auth[] = “xxxxxxxxxxxxxxxxxxxxxxxxxxxxxxxxx”;

// ***LINE TOKEN*** //
#define LINE_TOKEN “xxxxxxxxxxxxxxxxxxxxxxxxxxxxxxxxxxxxxxxxxx”

SimpleTimer timer;

BLYNK_CONNECTED() {
Blynk.syncAll();
}

void setup()
{
Serial.begin(115200);
Serial.println(“xxxxxxx”);
Serial.println(“xxxxxxxx”);
Serial.println(LINE.getVersion());
LINE.setToken(LINE_TOKEN);
LINE.notify(“[myarduino.net](http://myarduino.net/)”);

Blynk.begin(auth, “xxxx”, “xxxxxxxx”); //ใส่ชื่อ WIFI and PASSWORD

pinMode(LED_BUILTIN, OUTPUT);
digitalWrite(LED_BUILTIN, HIGH);
pinMode(D1, OUTPUT); // ***ควบคุมอุณหภูมิ*** ///
digitalWrite(D1, HIGH);

dht.begin();

timer.setInterval(1000L, sendUptime);

}

void sendUptime()
{
// *****ชุดคำสั่งการทำงานของอุณหภูมิ***** *//
Blynk.virtualWrite(V5, millis() / 1000);
sensors_event_t event;
dht.temperature().getEvent(&event);
if (!isnan(event.temperature)) {
Blynk.virtualWrite(V1, event.temperature);
if (event.temperature >=  `setTemp` ) {
digitalWrite(D1, LOW);
String LineText;
String string1 = "อุณหภูมิ ต่ำกว่ากำหนด “;
String string2 = " °C”;
LineText = string1 + event.temperature + string2;
Serial.print("Line ");
Serial.println(LineText);
LINE.notify(LineText);
}
else {
digitalWrite(D1, HIGH);
}
}
dht.humidity().getEvent(&event);
if (!isnan(event.relative_humidity)) {
Blynk.virtualWrite(V2, event.relative_humidity);
if (event.temperature >=  `setHumid` ) {
digitalWrite(D7, LOW);
String LineText;
String string1 = "ความชื้น ต่ำกว่ากำหนด “;
String string2 = " %”;
LineText = string1 + event.temperature + string2;
Serial.print("Line ");
Serial.println(LineText);
LINE.notify(LineText);
}
else {
digitalWrite(D7, HIGH);
}
}
}

//*********************************************************//

void loop()
{
//if(Blynk.connected()) {
Blynk.run();
timer.run();

}

//*********************************************************//
1 Likes
ไม่เป็นไรครับ ช่วยเจน QRCode ตัว Clone ของ app ที่ใช้กับโค้ตนี้ให้น้องเขาหน่อยนะครับ คงต้องลองให้เข้าเอาไปซึ่งศึกษาด้วยตัวเองดูก่อน
ขอบคุณมากครับพี่
ขอบคุณครับพี่
