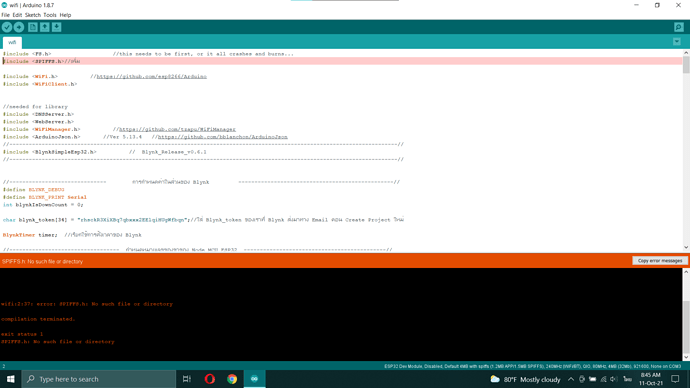
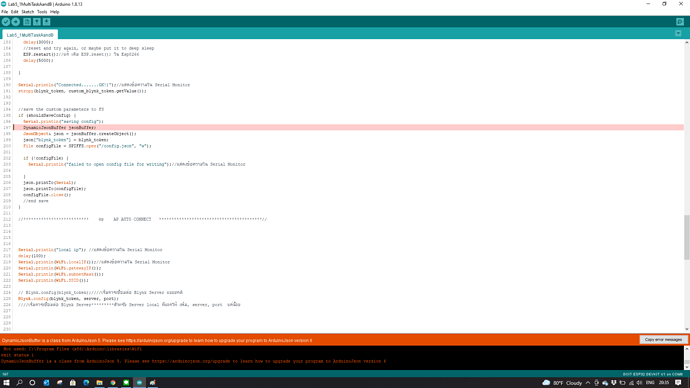
รบกวนหน่อยน่ะครับ ขอบคุณครับ
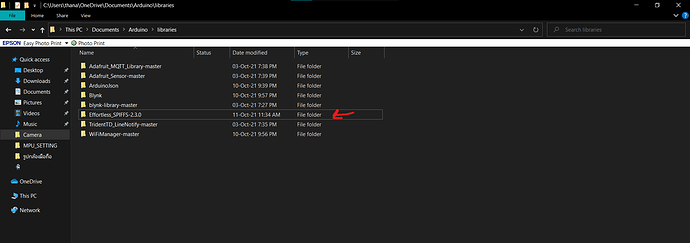
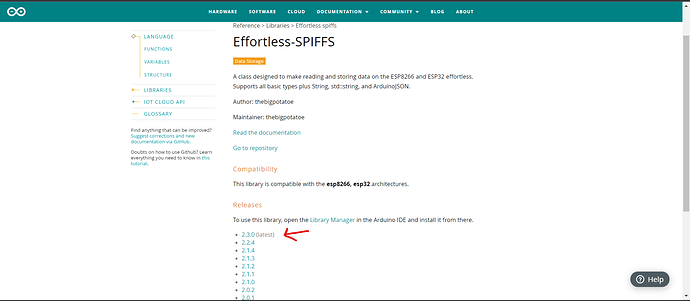
โหลด library อันนี้มาติดตั้งด้วยครับ

เปลี่ยนชื่อจาก -2.3.0 เป็น -master ครับ มันมองไม่เห็นโฟล์เดอร์
เคสนี้เป็นไงบ้างครับ อัพเดทหน่อย
ตอนนี้ลองเอาโค๊ดไปใช่งานมีปัญหาอยู่ว่าไวไฟดับแล้วesp32ไม่ยอมเชื่อมต่อไวไฟ
ดูใน Serial มันขึ้นว่าอะไรตอนต่อไม่ได้
ขอดูโค้ดหน่อยครับ จะช่วยดูให้ บางทีอาจจะใช้ไลบรารี ตัวใหม่ครับ
Code ผมก็อปมาจากในนี้แหละครับตอนมันหลุดwifiแล้วไม่ยอมเชื่อมต่อautoครับ
มันขึ้น blynk connect แต่ไม่ connect wifi เวลาเร้าเตอร์ดับแล้วเร้าเตอร์ติดมาใหม่ก็ไม่ connect
รายละเอียดน้อยจังเลยครับ ผมเลยไม่รู้ว่าต้องดูจุดไหนให้ครับ ![]()
#include <FS.h>                   //this needs to be first, or it all crashes and burns...
#include <SPIFFS.h>//เพิ่ม

#include <WiFi.h>          //https://github.com/esp8266/Arduino
#include <WiFiClient.h>


//needed for library
#include <DNSServer.h>
#include <WebServer.h>
#include <WiFiManager.h>          //https://github.com/tzapu/WiFiManager
#include <ArduinoJson.h>       //Ver 5.13.4   //https://github.com/bblanchon/ArduinoJson
//------------------------------------------------------------------------------------------------------------------------//
#include <BlynkSimpleEsp32.h>          //  Blynk_Release_v0.6.1
//------------------------------------------------------------------------------------------------------------------------//


//------------------------------        การกำหนดค่าในส่วนของ Blynk         ------------------------------------------------//
#define BLYNK_DEBUG
#define BLYNK_PRINT Serial
int blynkIsDownCount = 0;

char blynk_token[34] = "lE0j-VJUuIZ3mBZYfpcHqCT36ak29gdU";//ใส่ Blynk_token ของเราที่ Blynk ส่งมาทาง Email ตอน Create Project ใหม่

BlynkTimer timer;  //เรียกใช้การตั้งเวลาของ Blynk

//----------------------------------  กำหนดหมายเลขของขาของ Node MCU ESP32  --------------------------------------------//

const int Ledblynk = 2;                     // ใช้ไฟ LED สีฟ้า ของบอร์ด MCU ESP32 ให้มีสัญญาณไฟกระพริบ ตาม Code ที่เขียน
const int AP_Config = 23;                // ใช้เป็นปุ่มกด เพื่อเข้า AP Config ได้ตามความต้องการของผู้ใช้
//------------------------------------------------------------------------------------------------------------------------//


bool shouldSaveConfig = false;

//callback notifying us of the need to save config
void saveConfigCallback () {
  Serial.println("Should save config");
  shouldSaveConfig = true;
}
//------------------------------------------------------------------------------------------------------------------------//


//-------------สำหรับ Server local ที่แจกให้ เพิ่ม **** แค่ 2 บรรทัดนี้--------------   (ถ้าเป็น Blynk Server ปกติไม่ต้องใส่)  ----------//
char server[] = "oasiskit.com";
int port = 8080;
//------------------------------------------------------------------------------------------------------------------------//


//------------------------------------------------------------------------------------------------------------------------//
//*********************************************       void setup        **************************************************//
//------------------------------------------------------------------------------------------------------------------------//

void setup() {

  //-------IO NODE MCU Esp32-------//
  pinMode(Ledblynk, OUTPUT);      //กำหนดโหมดใช้งานให้กับขา Ledblynk เป็นขา สัญญาณไฟ ในสภาวะต่างๆ
  pinMode(AP_Config, INPUT_PULLUP);//กำหนดโหมดใช้งานให้กับขา AP_Config เป็นขา กดปุ่ม ค้าง เพื่อตั้งค่า AP config


  // ให้ LED ทั้งหมดดับก่อน
  digitalWrite(Ledblynk, LOW);//ให้หลอด LED สีฟ้าดับก่อน

  //-------------------------------//


  Serial.begin(115200);
  //-------------------------------//


  //*************************    การ อ่าน  เขียนค่า WiFi + Password ]ลงใน Node MCU ESP32   ************//

  //read configuration from FS json
  Serial.println("mounting FS...");//แสดงข้อความใน Serial Monitor

  if (SPIFFS.begin(true)) {
    Serial.println("mounted file system");
    if (SPIFFS.exists("/config.json")) {
      //file exists, reading and loading
      Serial.println("reading config file");
      File configFile = SPIFFS.open("/config.json", "r");
      if (configFile) {
        Serial.println("opened config file");
        size_t size = configFile.size();
        // Allocate a buffer to store contents of the file.
        std::unique_ptr<char[]> buf(new char[size]);

        configFile.readBytes(buf.get(), size);
        DynamicJsonBuffer jsonBuffer;
        JsonObject& json = jsonBuffer.parseObject(buf.get());
        json.printTo(Serial);
        if (json.success()) {
          Serial.println("\nparsed json");
          strcpy(blynk_token, json["blynk_token"]);

        } else {
          Serial.println("failed to load json config");//แสดงข้อความใน Serial Monitor
        }
      }
    }
  } else {
    Serial.println("failed to mount FS");//แสดงข้อความใน Serial Monitor
  }
  //end read
  Serial.println(blynk_token);

  //*************************   จบการ อ่าน  เขียนค่า WiFi + Password ]ลงใน Node MCU ESP32   **********//


  //**************************        AP AUTO CONNECT   ********************************************//

  WiFiManagerParameter custom_blynk_token("blynk", "blynk token", blynk_token, 34);

  //WiFiManager
  //Local intialization. Once its business is done, there is no need to keep it around
  WiFiManager wifiManager;

  //set config save notify callback
  wifiManager.setSaveConfigCallback(saveConfigCallback);

  wifiManager.addParameter(&custom_blynk_token);


  for (int i = 5; i > -1; i--) {  // นับเวลาถอยหลัง 5 วินาทีก่อนกดปุ่ม AP Config
    digitalWrite(Ledblynk, HIGH);
    delay(500);
    digitalWrite(Ledblynk, LOW);
    delay(500);
    Serial.print (String(i) + " ");//แสดงข้อความใน Serial Monitor
  }


  if (digitalRead(AP_Config) == LOW) {
    digitalWrite(Ledblynk, HIGH);
    Serial.println("Button Pressed");//แสดงข้อความใน Serial Monitor


    // wifiManager.resetSettings();//ให้ล้างค่า SSID และ Password ที่เคยบันทึกไว้
    wifi_init_config_t cfg = WIFI_INIT_CONFIG_DEFAULT(); //load the flash-saved configs
    esp_wifi_init(&cfg); //initiate and allocate wifi resources (does not matter if connection fails)
    delay(2000); //wait a bit
    if (esp_wifi_restore() != ESP_OK)

    {
      Serial.println("WiFi is not initialized by esp_wifi_init ");
    } else {
      Serial.println("WiFi Configurations Cleared!");
    }
    //continue
    //delay(1000);
    //esp_restart(); //just my reset configs routine...


  }

  wifiManager.setTimeout(60);
  //ใช้ได้ 2 กรณี
  //1. เมื่อกดปุ่มเพื่อ Config ค่า AP แล้ว จะขึ้นชื่อ AP ที่เราตั้งขึ้น
  //   ช่วงนี้ให้เราทำการตั้งค่า SSID+Password หรืออื่นๆทั้งหมด ภายใน 60 วินาที ก่อน AP จะหมดเวลา
  //   ไม่เช่นนั้น เมื่อครบเวลา 60 วินาที MCU จะ Reset เริ่มต้นใหม่ ให้เราตั้งค่าอีกครั้งภายใน 60 วินาที
  //2. ช่วงไฟดับ Modem router + MCU จะดับทั้งคู่ และเมื่อมีไฟมา ทั้งคู่ก็เริ่มทำงานเช่นกัน
  //   โดยปกติ Modem router จะ Boot ช้ากว่า  MCU ทำให้ MCU กลับไปเป็น AP รอให้เราตั้งค่าใหม่
  //   ดังนั้น AP จะรอเวลาให้เราตั้งค่า 60 วินาที ถ้าไม่มีการตั้งค่าใดๆ เมื่อครบ 60 วินาที MCU จะ Reset อีกครั้ง
  //   ถ้า Modem router  Boot และใช้งานได้ภายใน 60 วินาที และหลังจากที่ MCU Resset และเริ่มทำงานใหม่
  //   ก็จะสามารถเชื่อมต่อกับ  Modem router ที่ Boot และใช้งานได้แล้ว  ได้  ระบบจะทำงานปกติ


  if (!wifiManager.autoConnect("PUYIOT ESP32 AP CONFIG")) {
    Serial.println("failed to connect and hit timeout");//แสดงข้อความใน Serial Monitor
    delay(3000);
    //reset and try again, or maybe put it to deep sleep
    ESP.restart();//แก้ เดิม ESP.reset(); ใน Esp8266
    delay(5000);

  }

  Serial.println("Connected.......OK!)");//แสดงข้อความใน Serial Monitor
  strcpy(blynk_token, custom_blynk_token.getValue());


  //save the custom parameters to FS
  if (shouldSaveConfig) {
    Serial.println("saving config");
    DynamicJsonBuffer jsonBuffer;
    JsonObject& json = jsonBuffer.createObject();
    json["blynk_token"] = blynk_token;
    File configFile = SPIFFS.open("/config.json", "w");

    if (!configFile) {
      Serial.println("failed to open config file for writing");//แสดงข้อความใน Serial Monitor

    }
    json.printTo(Serial);
    json.printTo(configFile);
    configFile.close();
    //end save
  }

  //**************************    จบ    AP AUTO CONNECT   *****************************************//


  Serial.println("local ip"); //แสดงข้อความใน Serial Monitor
  delay(100);
  Serial.println(WiFi.localIP());//แสดงข้อความใน Serial Monitor
  Serial.println(WiFi.gatewayIP());
  Serial.println(WiFi.subnetMask());
  Serial.println(WiFi.SSID());

  // Blynk.config(blynk_token);////เริ่มการเชื่อมต่อ Blynk Server แบบปกติ
  Blynk.config(blynk_token, server, port);
  ////เริ่มการเชื่อมต่อ Blynk Server*********สำหรับ Server local ที่แจกให้ เพิ่ม, server, port  แค่นี้จบ


  timer.setInterval(30000L, reconnecting);  //Function reconnect

  //ตั้งเวลาส่งข้อมูลให้ Blynk Server ทุกๆ 30 วินาที


}


//------------------------------------------------------------------------------------------------------------------------//
//*********************************************   จบ  void setup        **************************************************//
//------------------------------------------------------------------------------------------------------------------------//


//------------------------------------------------------------------------------------------------------------------------//
//*********************************************       void Loop        ***************************************************//
//------------------------------------------------------------------------------------------------------------------------//


void loop() {


  //-----------------------------------------------------------------------------------------------------------//
  if (Blynk.connected())
  {
    Blynk.run();
    digitalWrite(Ledblynk, HIGH);

  } else {

    digitalWrite(Ledblynk, LOW);
    delay(200);
    digitalWrite(Ledblynk, HIGH);
    delay(100);

  }
  //-----------------------------------------------------------------------------------------------------------//

  timer.run();//ให้เวลาของ Blynk ทำงาน

  delay(100);


}

//------------------------------------------------------------------------------------------------------------------------//
//*********************************************      จบ void Loop       **************************************************//
//------------------------------------------------------------------------------------------------------------------------//


//------------------------------------------------------------------------------------------------------------------------//
void reconnecting()
{
  if (!Blynk.connected())
  {
    blynkIsDownCount++;
    BLYNK_LOG("blynk server is down! %d  times", blynkIsDownCount);
    Blynk.connect(5000);
  }
}


BLYNK_CONNECTED()
{

  Blynk.syncAll();//ให้ซิงค์ข้อมูลทั้งหมดล่าสุดจาก Blynk Server

}
พิมพ์หรือวางโค้ดที่นี่
ผมใช้codeตัวนี้อยู่ครับ
library แต่ล่ะตัวใช่เวอร์ชั่นไหนบ้างครับ
ขอบคุณครับ
ผมลองทำตามทุกข้อ มาติดข้อ 3
เจอไฟล์ HTTP_Method.h แต่เนื้อหาเป็นดังรูป มันต่างกับตัวอย่างเยอะ เลยไม่ได้แก้อะไร
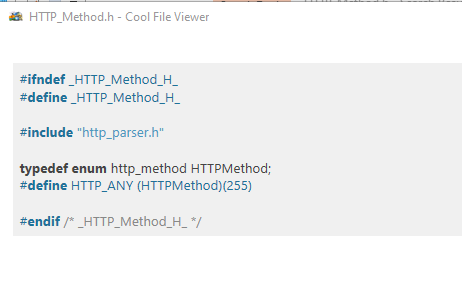
และลอง upload code ข้อ 5 แล้วมี error
Arduino: 1.8.19 (Windows Store 1.8.57.0) (Windows 10), Board: "NodeMCU-32S, 80MHz, 921600, None"


sketch_aug15a:96:11: error: DynamicJsonBuffer is a class from ArduinoJson 5. Please see https://arduinojson.org/upgrade to learn how to upgrade your program to ArduinoJson version 6

         DynamicJsonBuffer jsonBuffer;

           ^~~~~~~~~~~~~~~~~~~~~~~~~~~

sketch_aug15a:201:11: error: DynamicJsonBuffer is a class from ArduinoJson 5. Please see https://arduinojson.org/upgrade to learn how to upgrade your program to ArduinoJson version 6

     DynamicJsonBuffer jsonBuffer;

           ^~~~~~~~~~~~~~~~~~~~~~~

Multiple libraries were found for "Update.h"

 Used: C:\Users\NECgen4UEFI\Documents\Arduino\libraries\Update

 Not used: C:\Users\NECgen4UEFI\Documents\ArduinoData\packages\esp32\hardware\esp32\2.0.4\libraries\Update

Multiple libraries were found for "BlynkSimpleEsp32.h"

 Used: C:\Users\NECgen4UEFI\Documents\Arduino\libraries\blynk-library-master

 Not used: C:\Users\NECgen4UEFI\Documents\Arduino\libraries\Blynk

Multiple libraries were found for "FS.h"

 Used: C:\Users\NECgen4UEFI\Documents\Arduino\libraries\FS

 Not used: C:\Users\NECgen4UEFI\Documents\ArduinoData\packages\esp32\hardware\esp32\2.0.4\libraries\FS

Multiple libraries were found for "DNSServer.h"

 Used: C:\Users\NECgen4UEFI\Documents\Arduino\libraries\DNSServer

 Not used: C:\Users\NECgen4UEFI\Documents\ArduinoData\packages\esp32\hardware\esp32\2.0.4\libraries\DNSServer

Multiple libraries were found for "WebServer.h"

 Used: C:\Users\NECgen4UEFI\Documents\Arduino\libraries\WebServer

 Not used: C:\Users\NECgen4UEFI\Documents\ArduinoData\packages\esp32\hardware\esp32\2.0.4\libraries\WebServer

Multiple libraries were found for "SPIFFS.h"

 Used: C:\Users\NECgen4UEFI\Documents\Arduino\libraries\SPIFFS

 Not used: C:\Users\NECgen4UEFI\Documents\ArduinoData\packages\esp32\hardware\esp32\2.0.4\libraries\SPIFFS

Multiple libraries were found for "WiFi.h"

 Used: C:\Users\NECgen4UEFI\Documents\ArduinoData\packages\esp32\hardware\esp32\2.0.4\libraries\WiFi

 Not used: C:\Program Files\WindowsApps\ArduinoLLC.ArduinoIDE_1.8.57.0_x86__mdqgnx93n4wtt\libraries\WiFi

exit status 1

DynamicJsonBuffer is a class from ArduinoJson 5. Please see https://arduinojson.org/upgrade to learn how to upgrade your program to ArduinoJson version 6


This report would have more information with
"Show verbose output during compilation"
option enabled in File -> Preferences.
เลยไปต่อไม่ถูก
ขอคำแนะนำด้วยครับ
ขออนุญาตสมาชิกทุกท่านนะครับ เนื่องจากกระทู้นี้ผมทำไว้นาน และไม่ได้ใช้แล้ว โดยหันไปใช้ Library iotwebconf แทน ซึ่งสามารถใช้ได้ทั้ง esp8266.และ esp32 และมีความยืดหยุ่นกว่า ดังนั้นรบกวนสมาชิกที่สนใจ ลองค้นหาชื่อกระทู้ iotwebconf ที่ผมโพสต์ไว้ด้วยนะครับ
ขอบคุณครับ
