ผมไม่ทราบเรื่องการเขียน ระหว่าง ESP8266 to HC-sr04 ไปยัง appinventor ครับ แต่ผมได้ลองทำตามที่หาในgoogle มาบ้างแล้วครับ แต่ยังไม่ได้ เลยมาปรึกษาครับ
/*
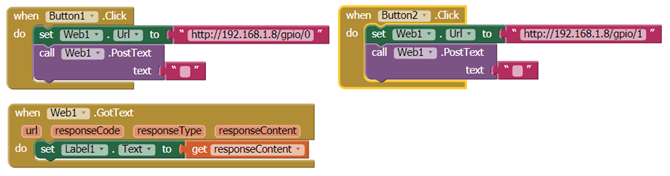
- This sketch demonstrates how to set up a simple HTTP-like server.
- The server will set a GPIO pin depending on the request
- http://192,168,1,8/gpio/0 will set the GPIO2 low,
- http://192,168,1,8/gpio/1 will set the GPIO2 high
- server_ip is the IP address of the ESP8266 module, will be
- printed to Serial when the module is connected.
- io follow gpio not d0 ---- supak 27 dec 2015
- Fix IP For test supak 27 dec 2015
*/
#define echoPin D7 // Echo Pin
#define trigPin D6 // Trigger Pin
long duration, distance; // Duration used to calculate distance
#include <ESP8266WiFi.h>
const char* ssid = “MCEtest”; // ชื่อ Access Point
const char* password = “88888888”; //password Access Point
IPAddress local_ip = {192,168,1,6}; // IP address ของ Node MCU แก้ตามเหมาะสมของผู้ใช้
IPAddress gateway = {192,168,1,2}; // ตั้งค่าตรงตาม Router ใน Local network
IPAddress subnet = {255,255,255,0};
WiFiServer server(80); // http port
// Create an instance of the server
// specify the port to listen on as an argument
void setup() {
pinMode(trigPin, OUTPUT);
pinMode(echoPin, INPUT);
Serial.begin(115200);
delay(10);
// prepare GPIO5 กำหนดขา ควบคุมค่า Output ของ Node MCU
pinMode(trigPin,0);
digitalWrite(trigPin,0);
// Connect to WiFi network
Serial.println();
Serial.println();
Serial.print(“Connecting to “);
Serial.println(ssid);
WiFi.begin(ssid, password);
WiFi.config(local_ip, gateway, subnet);
while (WiFi.status() != WL_CONNECTED) {
delay(500);
Serial.print(”.”);
}
Serial.println("");
Serial.println(“WiFi connected”);
// Start the server
server.begin();
Serial.println(“Server started”);
// Print the IP address
Serial.println(WiFi.localIP());
}
void loop() {
// Check if a client has connected
WiFiClient client = server.available();
if (!client) {
return;
}
// Wait until the client sends some data
Serial.println(“new client”);
while(!client.available()){
delay(1);
}
// Read the first line of the request
String req = client.readStringUntil(’\r’);
Serial.println(req);
client.flush();
// Match the request
int val;
if (req.indexOf("/gpio/0") != -1)
val = 0;
else if (req.indexOf("/gpio/1") != -1)
val = 1;
else {
Serial.println(“invalid request”);
client.stop();
return;
}
digitalWrite(trigPin,0);
client.flush();
String s = "HTTP/1.1 200 OK\r\nContent-Type: text/html\r\n\r\n\r\n\r\nGPIO is now ";
s += (val)?“high”:“low”;
s += “\n”;
client.print(s);
delay(1);
Serial.println(“Client disonnected”);
duration = pulseIn(echoPin, HIGH);
distance = duration/58.2;
Serial.println(distance);
delay(50);
}

นี้คือ Souce ครับ โปรเจคทำเครื่องวัดระยะทาง IOT ครับ
