สำหรับการทดสอบในหัวข้อนี้ ผมได้เขียนรายละเอียดต่างๆ เอาไว้เช่นการปรับแสงสว่างของหลอดแอลอีดีสีต่างๆ ที่ทำให้ดูแล้วสบายตาไม่จ้ามากเกินไป โดยการปรับเปลี่ยนค่า ความต้านทานที่เหมาะสมลงไป และมีผลการทดสอบการใช้ PNP transistors 2N3906 นำมาใช้กับ Module PCF8574T + ESP32 เอาไว้ด้วย โดยเน้นที่การเอาพุท ในรูปแบบของ LED ,Relay module High Active และ Low Active ครับ
ส่วนโปรเจคที่ใช้ในการทดสอบก็เหมือนเดิมครับ ผมจะทดสอบโดยใช้โค้ดที่มี WiFi Manager +ฺ Blynk เข้าไปด้วยนะครับ
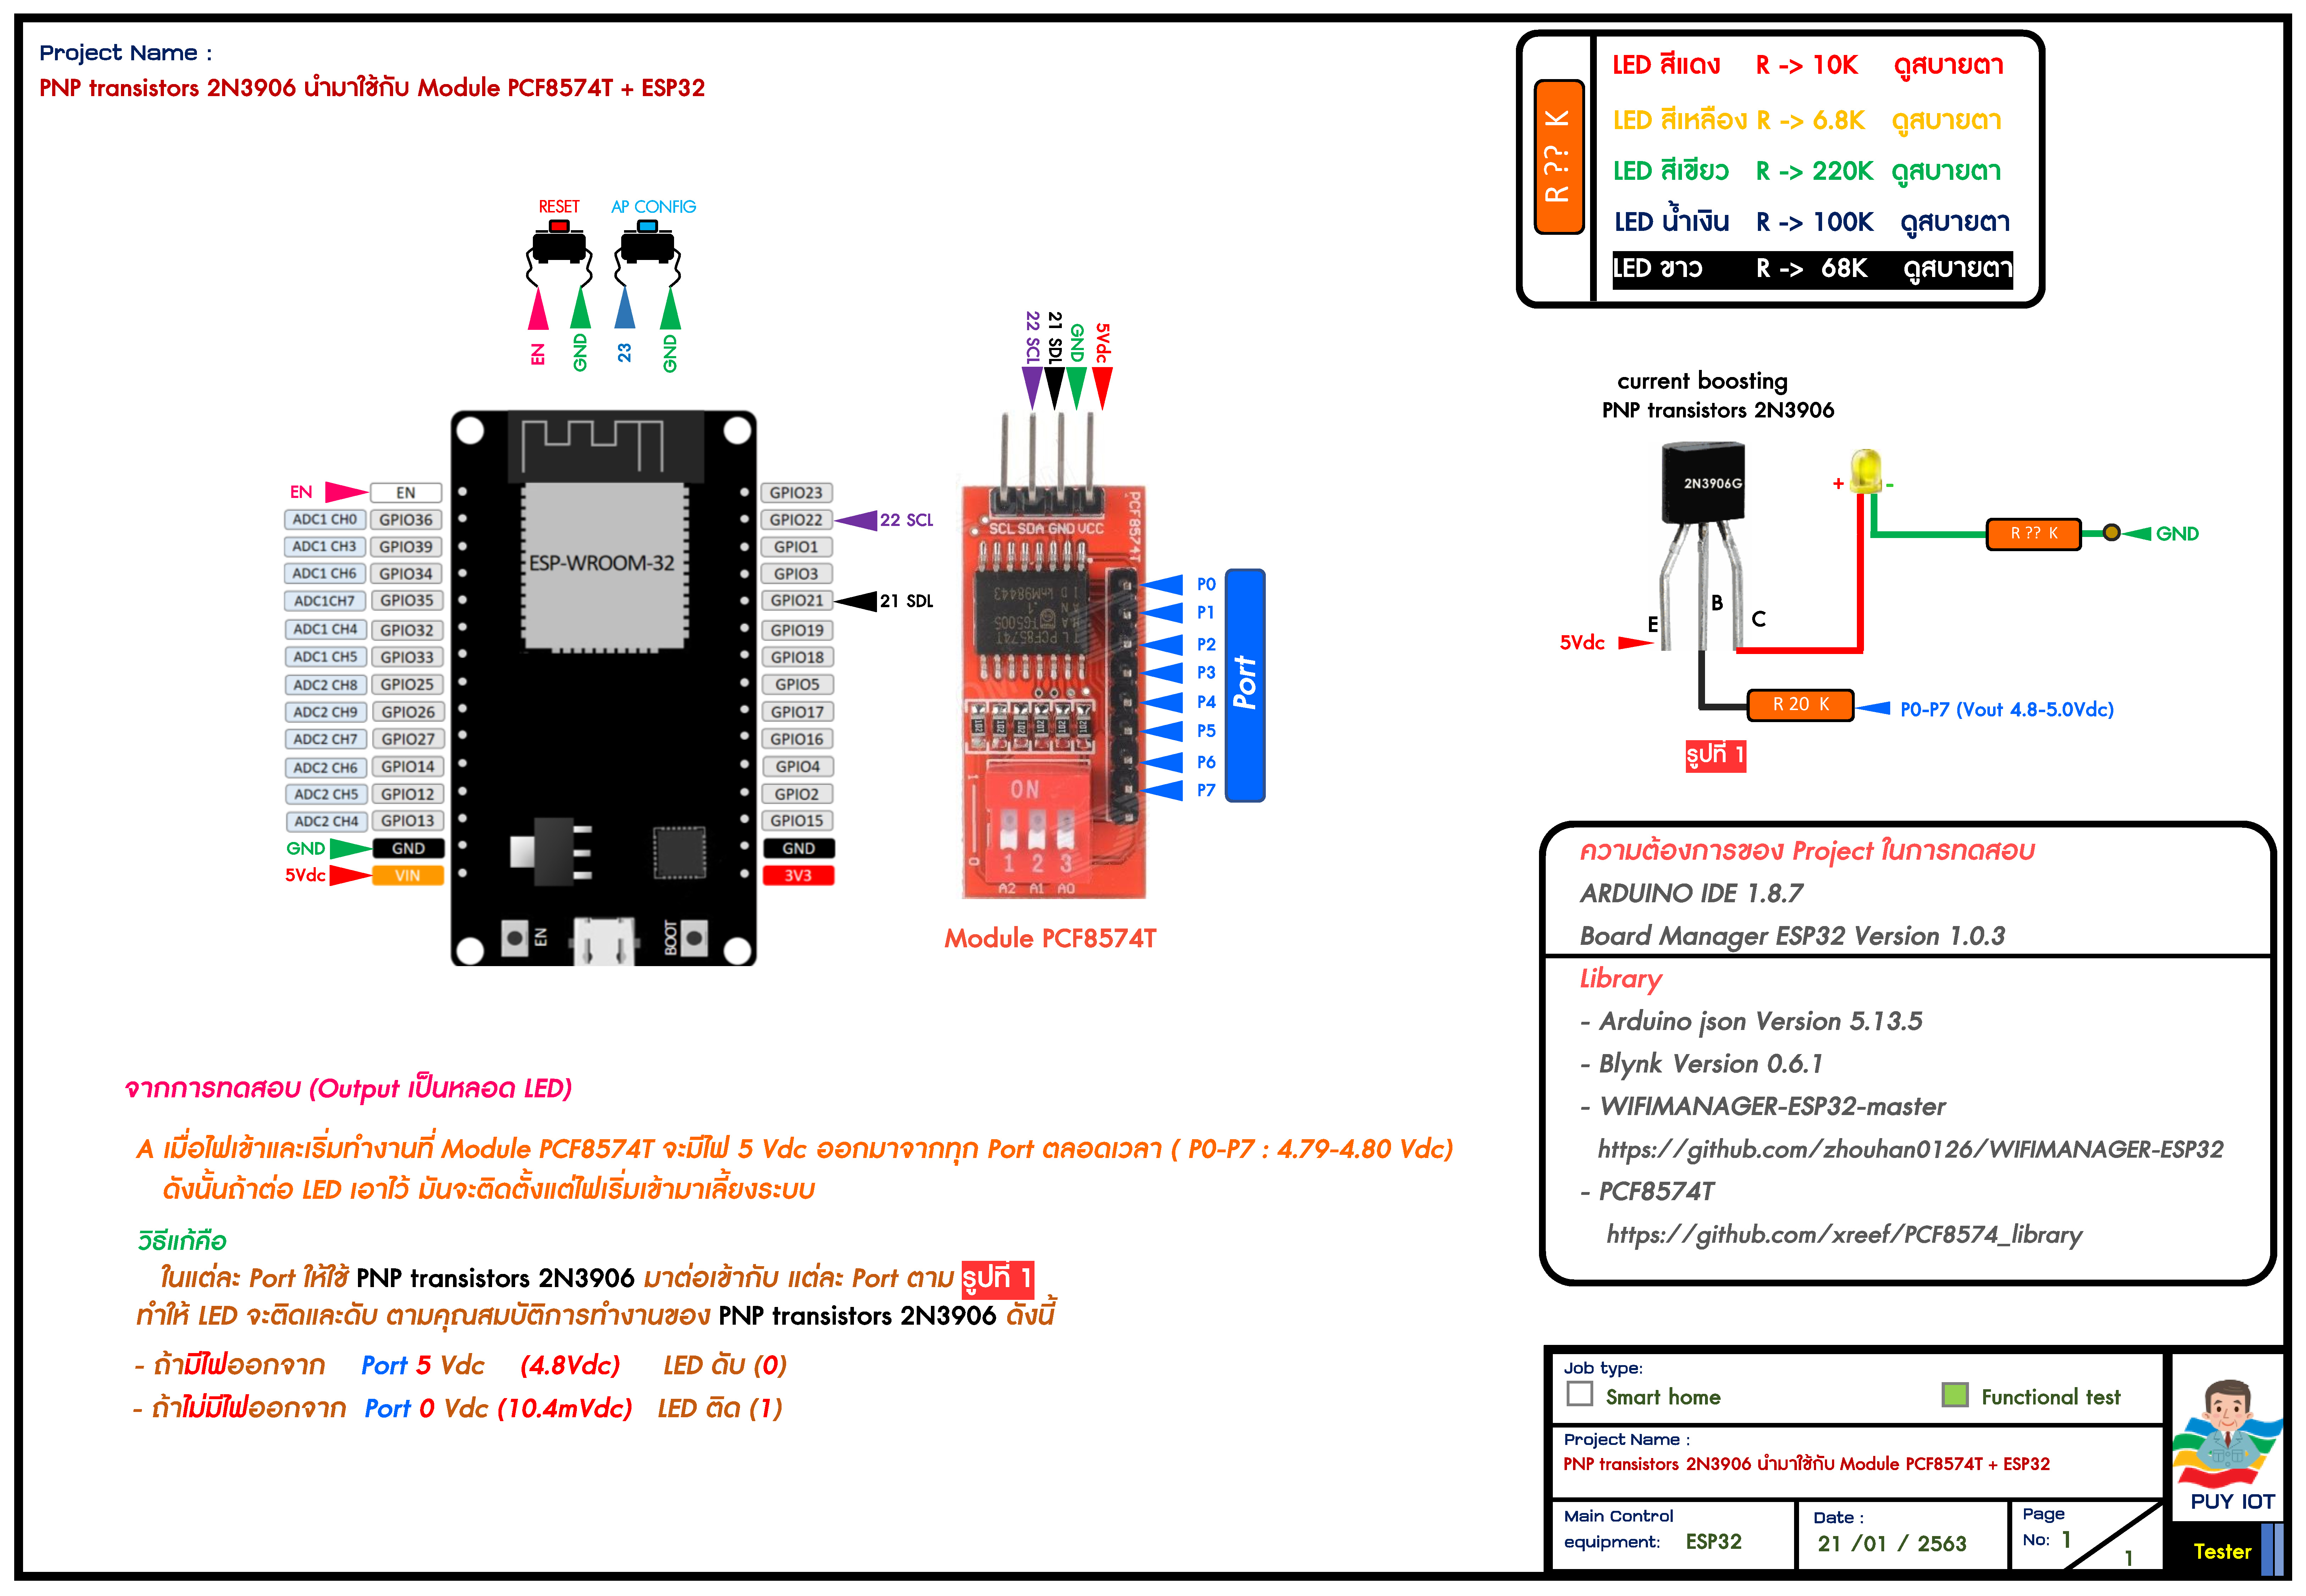
ความต้องการของ Project ในการทดสอบ
ARDUINO IDE 1.8.7
Board Manager ESP32 Version 1.0.3
Library
- Arduino json Version 5.13.5
- Blynk Version 0.6.1
- WIFIMANAGER-ESP32-master
GitHub - zhouhan0126/WIFIMANAGER-ESP32: wifimanager-esp32 - PCF8574T
GitHub - xreef/PCF8574_library: Library to use i2c digital expander with arduino, esp32 and esp8266. Can read write digital value with only 2 wire (perfect for ESP-01).
Code Update 23_01_2563 23:52
a#include <FS.h> //this needs to be first, or it all crashes and burns...
#include <SPIFFS.h>//เพิ่ม
#include <WiFi.h> //https://github.com/esp8266/Arduino
#include <WiFiClient.h>
//needed for library
#include <DNSServer.h>
#include <WebServer.h>
#include <WiFiManager.h> //https://github.com/tzapu/WiFiManager
#include <ArduinoJson.h> //Ver 5.13.4 //https://github.com/bblanchon/ArduinoJson
//------------------------------------------------------------------------------------------------------------------------//
#include <BlynkSimpleEsp32.h> // Blynk_Release_v0.6.1
//------------------------------------------------------------------------------------------------------------------------//
//------------------------------ การกำหนดค่าในส่วนของ Blynk ------------------------------------------------//
#define BLYNK_DEBUG
#define BLYNK_PRINT Serial
int blynkIsDownCount = 0;
char blynk_token[34] = "lE0j-VJUuIZ3mBZYfpcHqCT36ak29gdU";//ใส่ Blynk_token ของเราที่ Blynk ส่งมาทาง Email ตอน Create Project ใหม่
BlynkTimer timer; //เรียกใช้การตั้งเวลาของ Blynk
//---------------------------------- กำหนดหมายเลขของขาของ Node MCU ESP32 --------------------------------------------//
const int Ledblynk = 2; // ใช้ไฟ LED สีฟ้า ของบอร์ด MCU ESP32 ให้มีสัญญาณไฟกระพริบ ตาม Code ที่เขียน
const int AP_Config = 23; // ใช้เป็นปุ่มกด เพื่อเข้า AP Config ได้ตามความต้องการของผู้ใช้
//------------------------------------------------------------------------------------------------------------------------//
bool shouldSaveConfig = false;
//callback notifying us of the need to save config
void saveConfigCallback () {
Serial.println("Should save config");
shouldSaveConfig = true;
}
//------------------------------------------------------------------------------------------------------------------------//
//-------------สำหรับ Server local ที่แจกให้ เพิ่ม **** แค่ 2 บรรทัดนี้-------------- (ถ้าเป็น Blynk Server ปกติไม่ต้องใส่) ----------//
char server[] = "oasiskit.com";
int port = 8080;
//------------------------------------------------------------------------------------------------------------------------//
//-------------------------------------------IO Extender ---PCF8574-------------------------------------------------------//
#include "PCF8574.h" //โหลดไลบารี่ ของ PCF8574 มาใช้งาน
//PCF8574 pcf8574_3(0x3C);//ตัวที่ 3
//PCF8574 pcf8574_2(0x3A); //ตัวที่ 2
PCF8574 pcf8574_1(0x38); //ตัวที่ 1
unsigned long timeElapsed;
//------------------------------------------------------------------------------------------------------------------------//
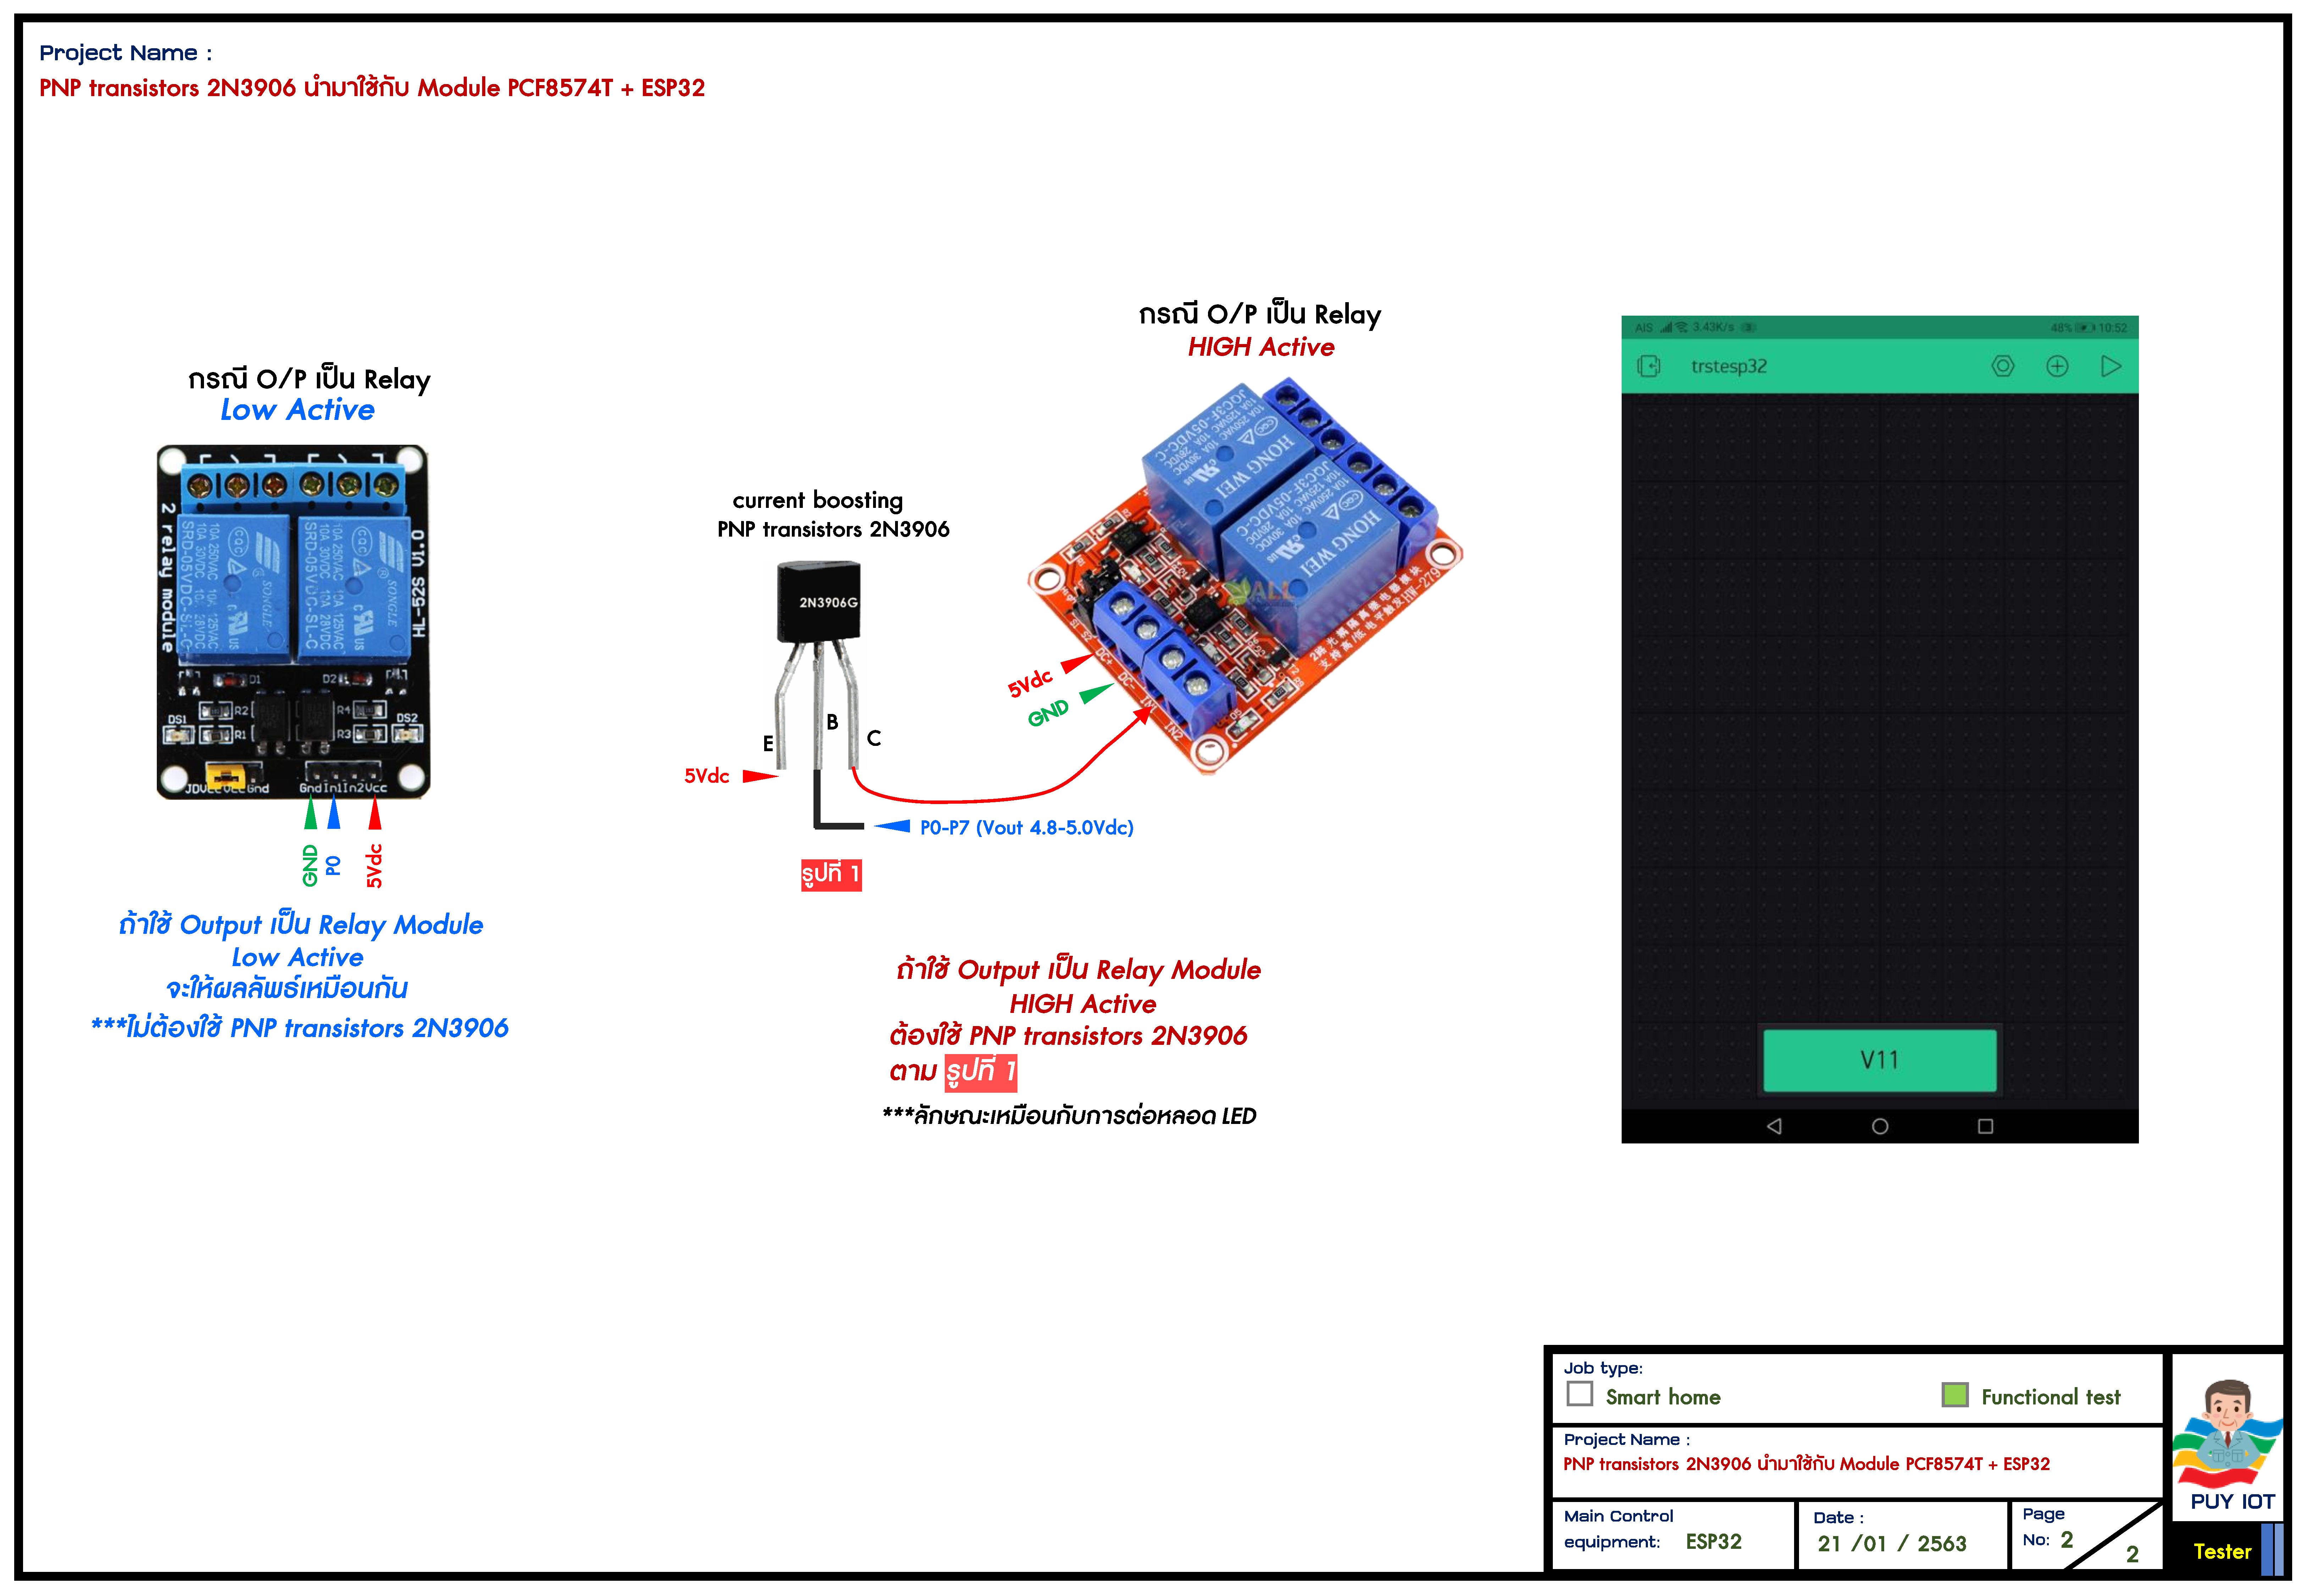
BLYNK_WRITE(V11)
{
int pinValue = param.asInt();
if (pinValue == 1) {
pcf8574_1.digitalWrite(P0, 0);//P0 = 0 จะไม่มีไฟ 5 Vdc เข้ามา จะทำให้ O/P LED = 1 (ติด)
}
if (pinValue == 0) {
pcf8574_1.digitalWrite(P0, 1);//P0 = 1 จะมีไฟ 5 Vdc เข้ามา จะทำให้ O/P LED = 0 (ดับ)
}
}
//------------------------------------------------------------------------------------------------------------------------//
//------------------------------------------------------------------------------------------------------------------------//
//********************************************* void setup **************************************************//
//------------------------------------------------------------------------------------------------------------------------//
void setup() {
//-------IO NODE MCU Esp32-------//
pinMode(Ledblynk, OUTPUT); //กำหนดโหมดใช้งานให้กับขา Ledblynk เป็นขา สัญญาณไฟ ในสภาวะต่างๆ
pinMode(AP_Config, INPUT_PULLUP);//กำหนดโหมดใช้งานให้กับขา AP_Config เป็นขา กดปุ่ม ค้าง เพื่อตั้งค่า AP config
// ให้ LED ทั้งหมดดับก่อน
digitalWrite(Ledblynk, LOW);//ให้หลอด LED สีฟ้าดับก่อน
//-------------------------------//
pcf8574_1.begin();//เริ่ม Begin ก่อนแล้วค่อยกำหนดขา
timeElapsed = millis();
pcf8574_1.pinMode(P0, OUTPUT);
Serial.begin(115200);
//-------------------------------//
//************************* การ อ่าน เขียนค่า WiFi + Password ]ลงใน Node MCU ESP32 ************//
//read configuration from FS json
Serial.println("mounting FS...");//แสดงข้อความใน Serial Monitor
if (SPIFFS.begin(true)) {
Serial.println("mounted file system");
if (SPIFFS.exists("/config.json")) {
//file exists, reading and loading
Serial.println("reading config file");
File configFile = SPIFFS.open("/config.json", "r");
if (configFile) {
Serial.println("opened config file");
size_t size = configFile.size();
// Allocate a buffer to store contents of the file.
std::unique_ptr<char[]> buf(new char[size]);
configFile.readBytes(buf.get(), size);
DynamicJsonBuffer jsonBuffer;
JsonObject& json = jsonBuffer.parseObject(buf.get());
json.printTo(Serial);
if (json.success()) {
Serial.println("\nparsed json");
strcpy(blynk_token, json["blynk_token"]);
} else {
Serial.println("failed to load json config");//แสดงข้อความใน Serial Monitor
}
}
}
} else {
Serial.println("failed to mount FS");//แสดงข้อความใน Serial Monitor
}
//end read
Serial.println(blynk_token);
//************************* จบการ อ่าน เขียนค่า WiFi + Password ]ลงใน Node MCU ESP32 **********//
//************************** AP AUTO CONNECT ********************************************//
WiFiManagerParameter custom_blynk_token("blynk", "blynk token", blynk_token, 34);
//WiFiManager
//Local intialization. Once its business is done, there is no need to keep it around
WiFiManager wifiManager;
//set config save notify callback
wifiManager.setSaveConfigCallback(saveConfigCallback);
wifiManager.addParameter(&custom_blynk_token);
for (int i = 5; i > -1; i--) { // นับเวลาถอยหลัง 5 วินาทีก่อนกดปุ่ม AP Config
digitalWrite(Ledblynk, HIGH);
delay(500);
digitalWrite(Ledblynk, LOW);
delay(500);
Serial.print (String(i) + " ");//แสดงข้อความใน Serial Monitor
}
if (digitalRead(AP_Config) == LOW) {
digitalWrite(Ledblynk, HIGH);
Serial.println("Button Pressed");//แสดงข้อความใน Serial Monitor
// wifiManager.resetSettings();//ให้ล้างค่า SSID และ Password ที่เคยบันทึกไว้
wifi_init_config_t cfg = WIFI_INIT_CONFIG_DEFAULT(); //load the flash-saved configs
esp_wifi_init(&cfg); //initiate and allocate wifi resources (does not matter if connection fails)
delay(2000); //wait a bit
if (esp_wifi_restore() != ESP_OK)
{
Serial.println("WiFi is not initialized by esp_wifi_init ");
} else {
Serial.println("WiFi Configurations Cleared!");
}
//continue
//delay(1000);
//esp_restart(); //just my reset configs routine...
}
wifiManager.setTimeout(60);
//ใช้ได้ 2 กรณี
//1. เมื่อกดปุ่มเพื่อ Config ค่า AP แล้ว จะขึ้นชื่อ AP ที่เราตั้งขึ้น
// ช่วงนี้ให้เราทำการตั้งค่า SSID+Password หรืออื่นๆทั้งหมด ภายใน 60 วินาที ก่อน AP จะหมดเวลา
// ไม่เช่นนั้น เมื่อครบเวลา 60 วินาที MCU จะ Reset เริ่มต้นใหม่ ให้เราตั้งค่าอีกครั้งภายใน 60 วินาที
//2. ช่วงไฟดับ Modem router + MCU จะดับทั้งคู่ และเมื่อมีไฟมา ทั้งคู่ก็เริ่มทำงานเช่นกัน
// โดยปกติ Modem router จะ Boot ช้ากว่า MCU ทำให้ MCU กลับไปเป็น AP รอให้เราตั้งค่าใหม่
// ดังนั้น AP จะรอเวลาให้เราตั้งค่า 60 วินาที ถ้าไม่มีการตั้งค่าใดๆ เมื่อครบ 60 วินาที MCU จะ Reset อีกครั้ง
// ถ้า Modem router Boot และใช้งานได้ภายใน 60 วินาที และหลังจากที่ MCU Resset และเริ่มทำงานใหม่
// ก็จะสามารถเชื่อมต่อกับ Modem router ที่ Boot และใช้งานได้แล้ว ได้ ระบบจะทำงานปกติ
if (!wifiManager.autoConnect("PUYIOT ESP32 AP CONFIG")) {
Serial.println("failed to connect and hit timeout");//แสดงข้อความใน Serial Monitor
delay(3000);
//reset and try again, or maybe put it to deep sleep
ESP.restart();//แก้ เดิม ESP.reset(); ใน Esp8266
delay(5000);
}
Serial.println("Connected.......OK!)");//แสดงข้อความใน Serial Monitor
strcpy(blynk_token, custom_blynk_token.getValue());
//save the custom parameters to FS
if (shouldSaveConfig) {
Serial.println("saving config");
DynamicJsonBuffer jsonBuffer;
JsonObject& json = jsonBuffer.createObject();
json["blynk_token"] = blynk_token;
File configFile = SPIFFS.open("/config.json", "w");
if (!configFile) {
Serial.println("failed to open config file for writing");//แสดงข้อความใน Serial Monitor
}
json.printTo(Serial);
json.printTo(configFile);
configFile.close();
//end save
}
//************************** จบ AP AUTO CONNECT *****************************************//
Serial.println("local ip"); //แสดงข้อความใน Serial Monitor
delay(100);
Serial.println(WiFi.localIP());//แสดงข้อความใน Serial Monitor
Serial.println("gateway");
delay(100);
Serial.println(WiFi.gatewayIP());
Serial.println("subnetMask");
delay(100);
Serial.println(WiFi.subnetMask());
Serial.println("SSID");
delay(100);
Serial.println(WiFi.SSID());
Serial.println("Password");
delay(100);
Serial.println(WiFi.psk());
// Blynk.config(blynk_token);////เริ่มการเชื่อมต่อ Blynk Server แบบปกติ
Blynk.config(blynk_token, server, port);
////เริ่มการเชื่อมต่อ Blynk Server*********สำหรับ Server local ที่แจกให้ เพิ่ม, server, port แค่นี้จบ
timer.setInterval(30000L, reconnecting); //Function reconnect
//ตั้งเวลาส่งข้อมูลให้ Blynk Server ทุกๆ 30 วินาที
}
//------------------------------------------------------------------------------------------------------------------------//
//********************************************* จบ void setup **************************************************//
//------------------------------------------------------------------------------------------------------------------------//
//------------------------------------------------------------------------------------------------------------------------//
//********************************************* void Loop ***************************************************//
//------------------------------------------------------------------------------------------------------------------------//
void loop() {
//-----------------------------------------------------------------------------------------------------------//
if (Blynk.connected())
{
Blynk.run();
digitalWrite(Ledblynk, HIGH);
} else {
digitalWrite(Ledblynk, LOW);
delay(200);
digitalWrite(Ledblynk, HIGH);
delay(100);
}
//-----------------------------------------------------------------------------------------------------------//
timer.run();//ให้เวลาของ Blynk ทำงาน
delay(100);
}
//------------------------------------------------------------------------------------------------------------------------//
//********************************************* จบ void Loop **************************************************//
//------------------------------------------------------------------------------------------------------------------------//
//------------------------------------------------------------------------------------------------------------------------//
void reconnecting()
{
if (!Blynk.connected())
{
blynkIsDownCount++;
BLYNK_LOG("blynk server is down! %d times", blynkIsDownCount);
Blynk.connect(5000);
}
}
BLYNK_CONNECTED()
{
Blynk.syncAll();//ให้ซิงค์ข้อมูลทั้งหมดล่าสุดจาก Blynk Server
}