#define BLYNK_AUTH_TOKEN "yBqcaq4-yNXA-d1KYvkRbmVPpuN8EqvD"
#define BLYNK_TEMPLATE_ID "TMPL69GItorGp"
#define BLYNK_TEMPLATE_NAME "superminini"
#define BLYNK_PRINT Serial
#include <WiFi.h>
#include <WiFiClient.h>
#include <BlynkSimpleEsp32.h>
char auth[] = "yBqcaq4-yNXA-d1KYvkRbmVPpuN8EqvD";
char ssid[] = "Wokwi-GUEST"; // เปลี่ยนชื่อ Wi-Fi หรือใช้ Wi-Fi ที่เชื่อมต่อจริง
char pass[] = ""; // รหัสผ่าน Wi-Fi (หากไม่มีให้เว้นว่าง)
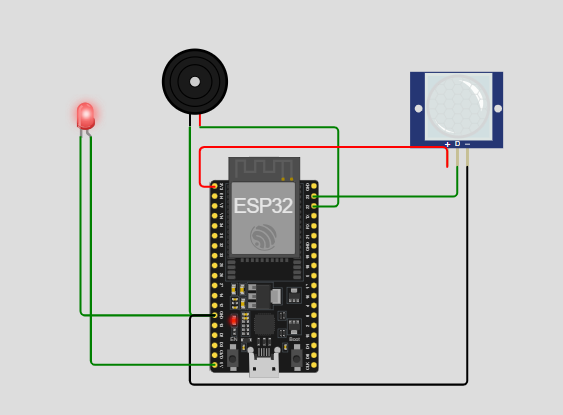
int digitalPin = 23; // ขา 23 สำหรับเซ็นเซอร์
int buzzer = 22; // ขา 22 สำหรับบัซเซอร์
int ledPin = 2; // ขา 2 สำหรับ LED
int val = 0;
void setup() {
pinMode(buzzer, OUTPUT);
pinMode(digitalPin, INPUT);
pinMode(ledPin, OUTPUT);
Serial.begin(115200); // เปลี่ยน baud rate เป็น 115200
// เชื่อมต่อ Wi-Fi
WiFi.begin(ssid, pass);
while (WiFi.status() != WL_CONNECTED) {
delay(1000);
Serial.println("กำลังเชื่อมต่อ Wi-Fi...");
}
Serial.println("เชื่อมต่อ Wi-Fi สำเร็จ!");
Serial.print("IP address: ");
Serial.println(WiFi.localIP());
// Start Blynk
Blynk.begin(auth, ssid, pass);
// ตรวจสอบการเชื่อมต่อกับ Blynk
while (!Blynk.connect()) {
Serial.println("กำลังเชื่อมต่อกับ Blynk...");
delay(1000);
}
Serial.println("เชื่อมต่อ Blynk สำเร็จ!");
}
void loop() {
// เรียกใช้งาน Blynk
Blynk.run();
// อ่านค่าจากเซ็นเซอร์
val = digitalRead(digitalPin);
Serial.print("val = ");
Serial.println(val);
// ตรวจสอบค่าจากเซ็นเซอร์
if (val == 0) {
digitalWrite(buzzer, HIGH); // เปิดบัซเซอร์
digitalWrite(ledPin, HIGH); // เปิด LED
Serial.println("ไม่พบวัตถุ");
Blynk.virtualWrite(V0, "ไม่พบวัตถุ"); // ส่งข้อมูลไปยัง Blynk
}
else {
digitalWrite(buzzer, LOW); // ปิดบัซเซอร์
digitalWrite(ledPin, LOW); // ปิด LED
Serial.println("ตรวจพบวัตถุ");
Blynk.virtualWrite(V0, "ตรวจพบวัตถุ"); // ส่งข้อมูลไปยัง Blynk
}
delay(300); // Delay สำหรับการอัพเดตข้อมูล
}
ลอง Basic connect blynk รึยัง online รึป่าว
/*************************************************************

  You’ll need:
   - Blynk IoT app (download from App Store or Google Play)
   - ESP32 board
   - Decide how to connect to Blynk
     (USB, Ethernet, Wi-Fi, Bluetooth, ...)

  There is a bunch of great example sketches included to show you how to get
  started. Think of them as LEGO bricks  and combine them as you wish.
  For example, take the Ethernet Shield sketch and combine it with the
  Servo example, or choose a USB sketch and add a code from SendData
  example.
 *************************************************************/

/* Fill-in information from Blynk Device Info here */
#define BLYNK_TEMPLATE_ID           "TMPxxxxxx"
#define BLYNK_TEMPLATE_NAME         "Device"
#define BLYNK_AUTH_TOKEN            "YourAuthToken"

/* Comment this out to disable prints and save space */
#define BLYNK_PRINT Serial


#include <WiFi.h>
#include <WiFiClient.h>
#include <BlynkSimpleEsp32.h>

// Your WiFi credentials.
// Set password to "" for open networks.
char ssid[] = "YourNetworkName";
char pass[] = "YourPassword";

void setup()
{
  // Debug console
  Serial.begin(115200);

  Blynk.begin(BLYNK_AUTH_TOKEN, ssid, pass);
  // You can also specify server:
  //Blynk.begin(BLYNK_AUTH_TOKEN, ssid, pass, "blynk.cloud", 80);
  //Blynk.begin(BLYNK_AUTH_TOKEN, ssid, pass, IPAddress(192,168,1,100), 8080);
}

void loop()
{
  Blynk.run();
  // You can inject your own code or combine it with other sketches.
  // Check other examples on how to communicate with Blynk. Remember
  // to avoid delay() function!
}
