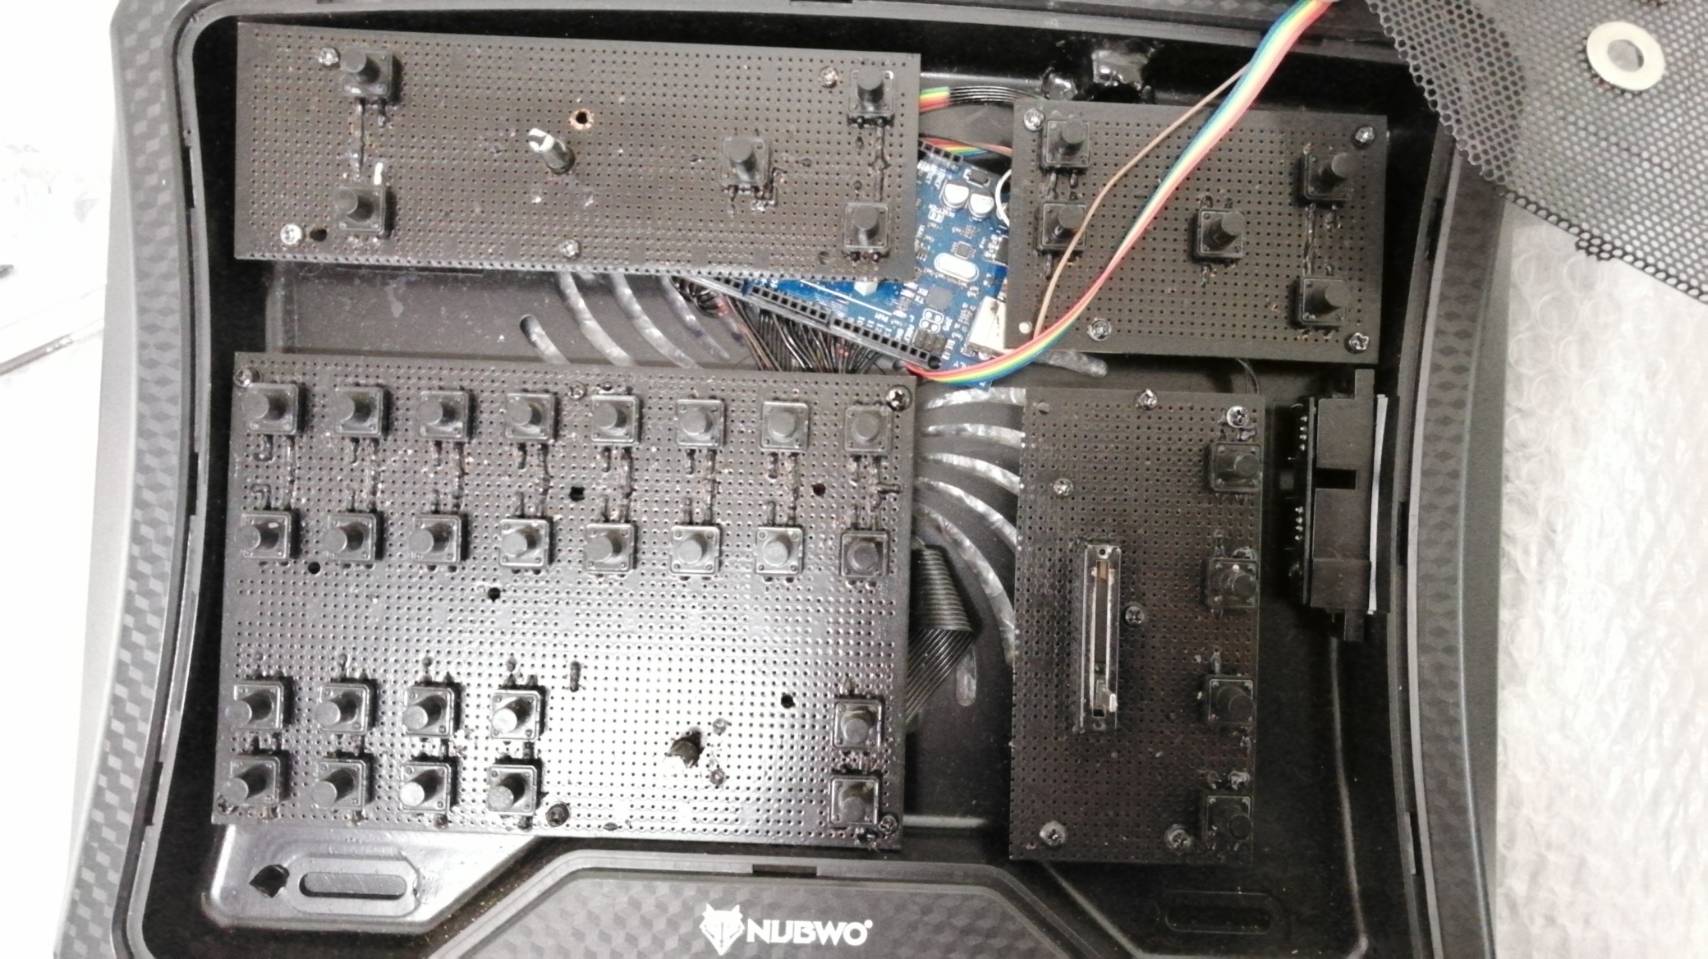
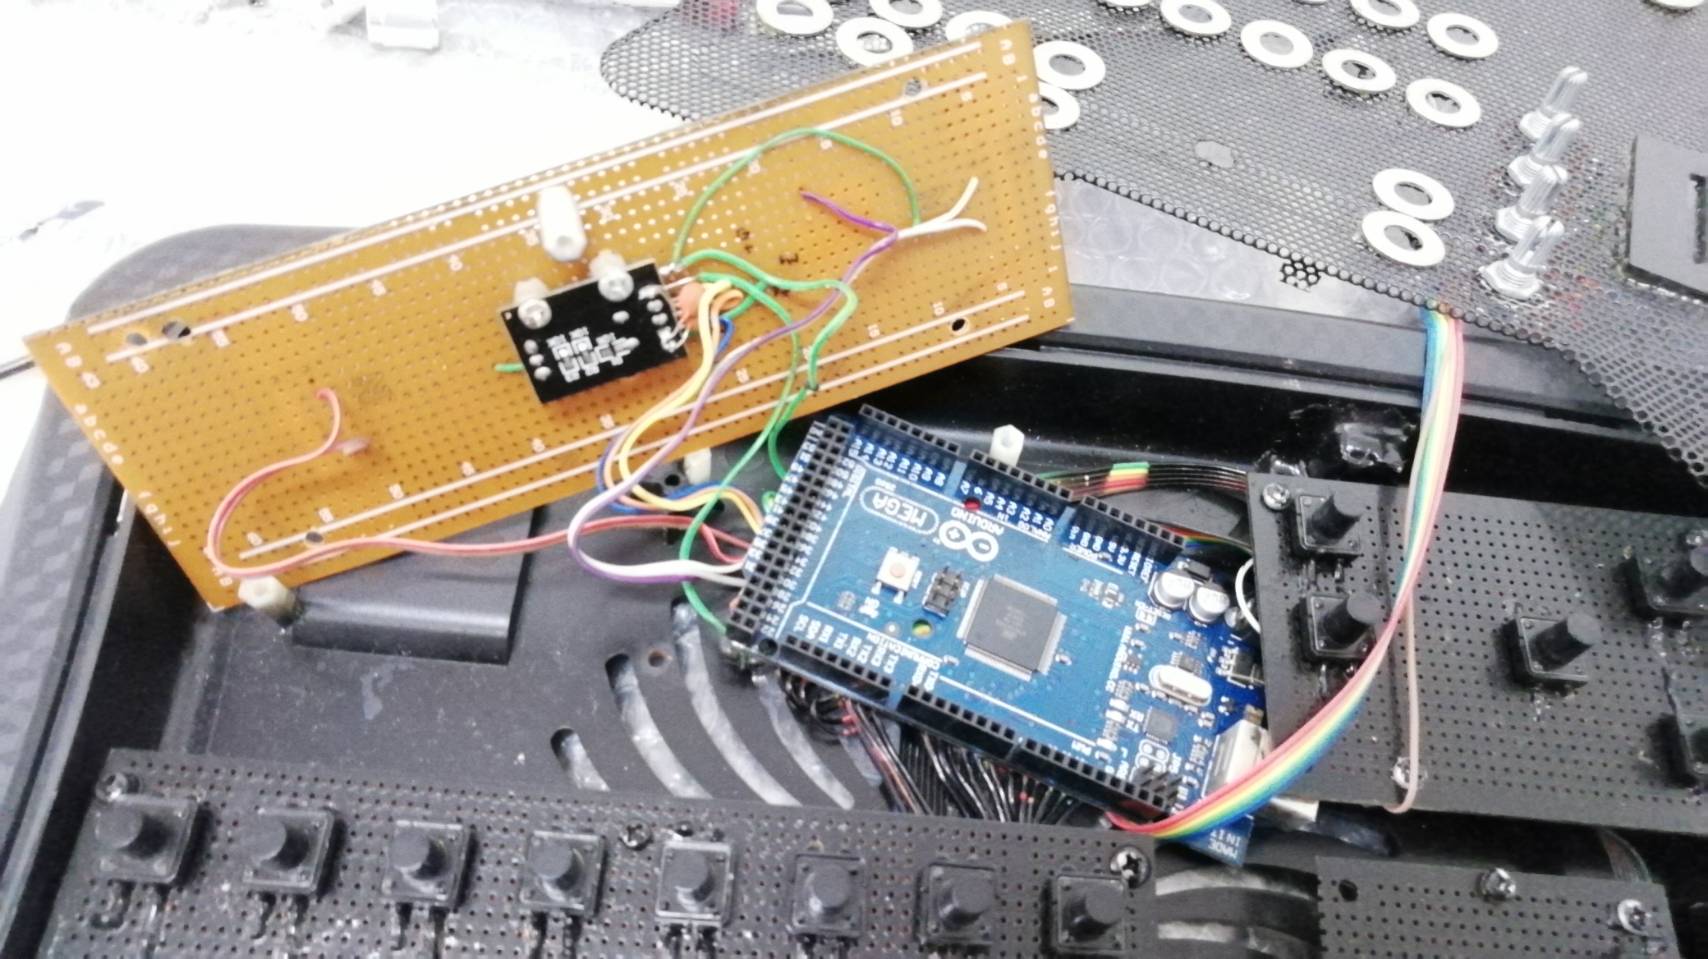
ก่อนอื่นเรามาดูภาพรวมของระบบกันก่อนครับ (พอดีช่วงนี้ผมมีเวลาครับ จึงอยากทำตัวให้มีประโยชน์กับผู้อื่นบ้าง)
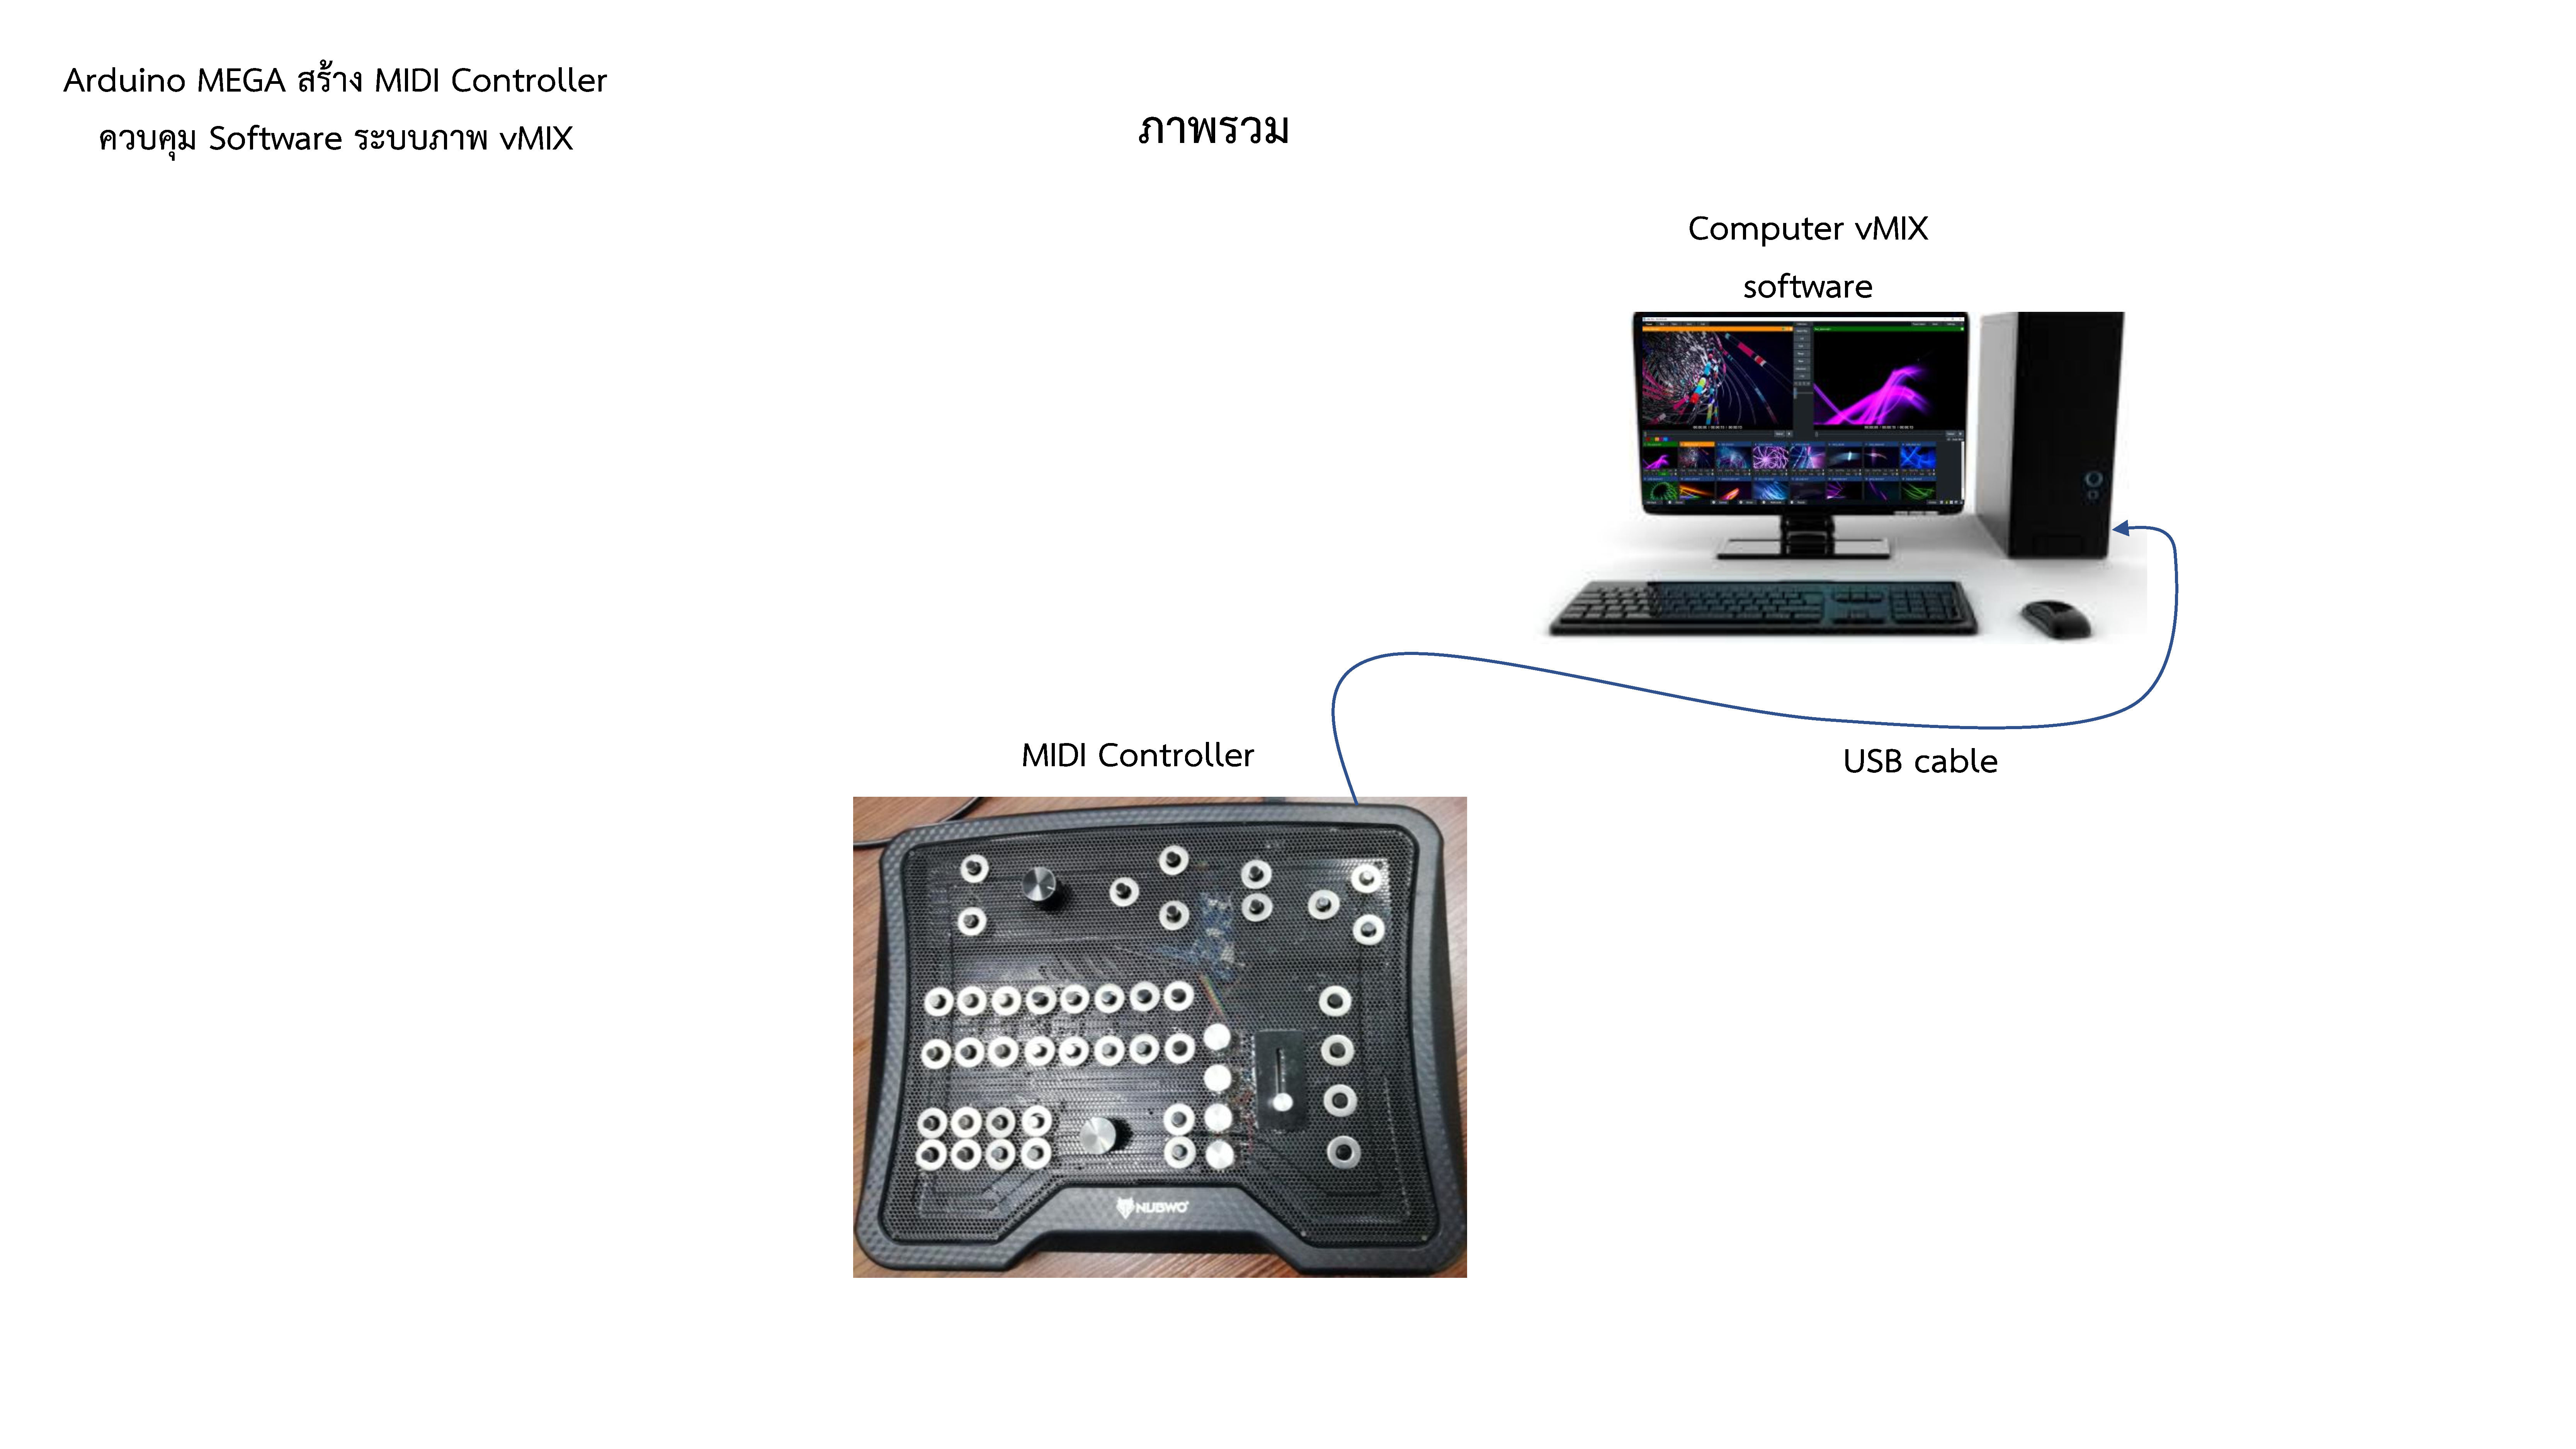
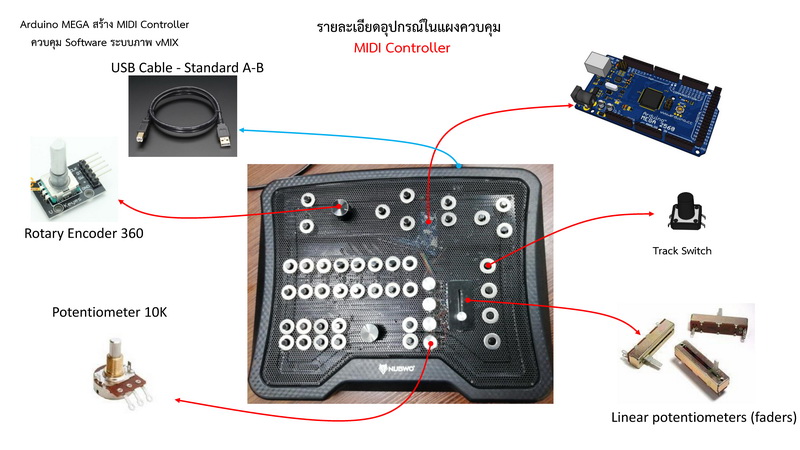
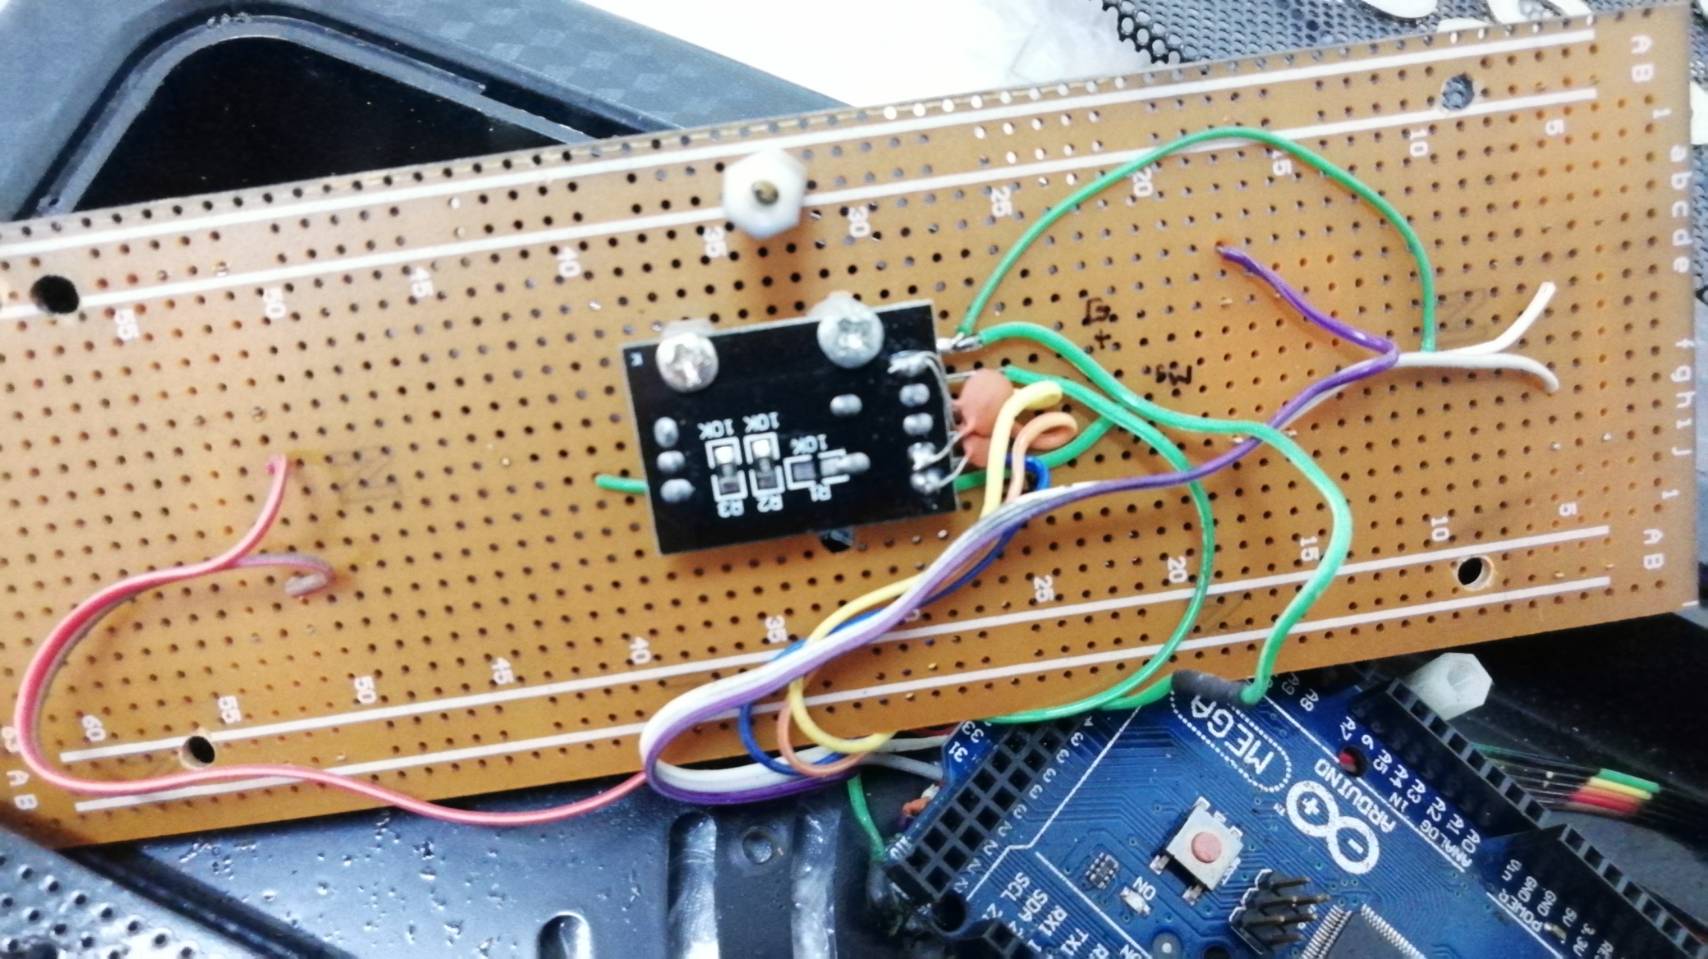
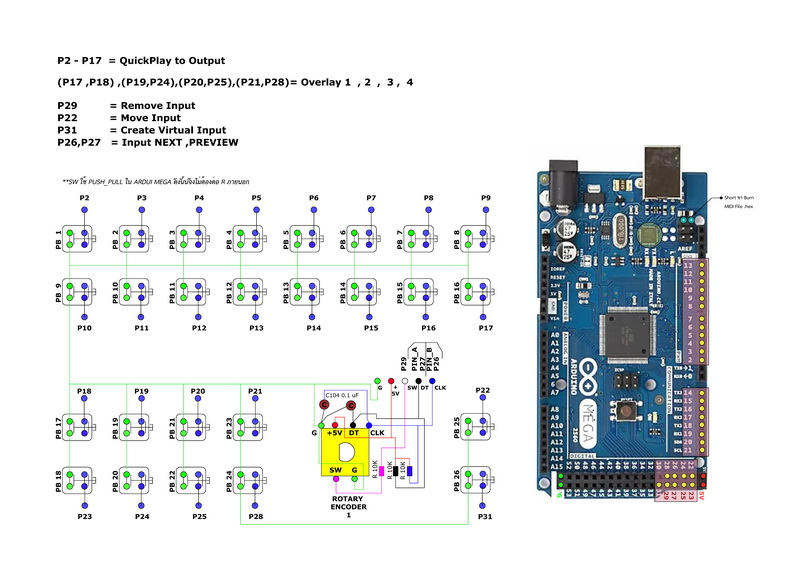
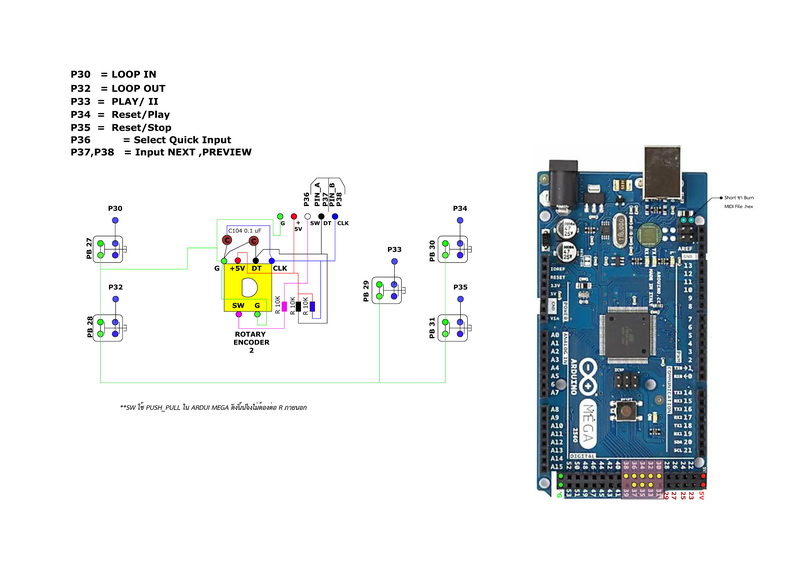
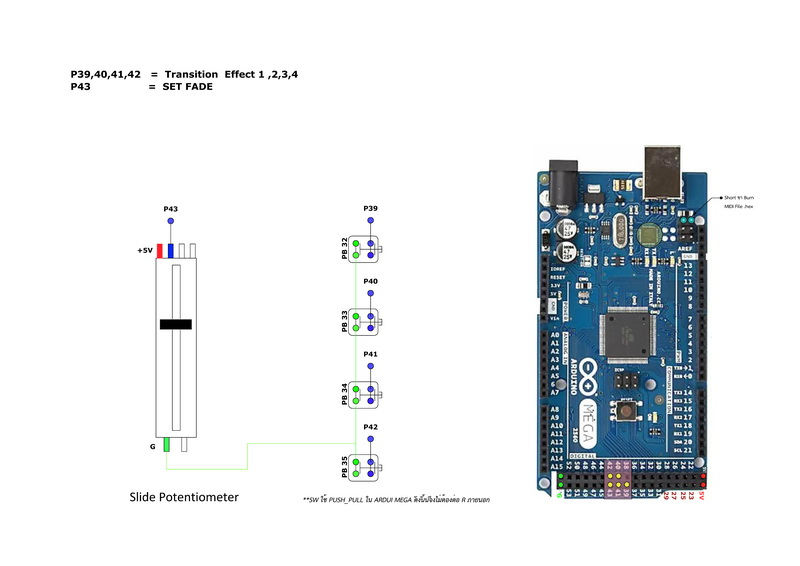
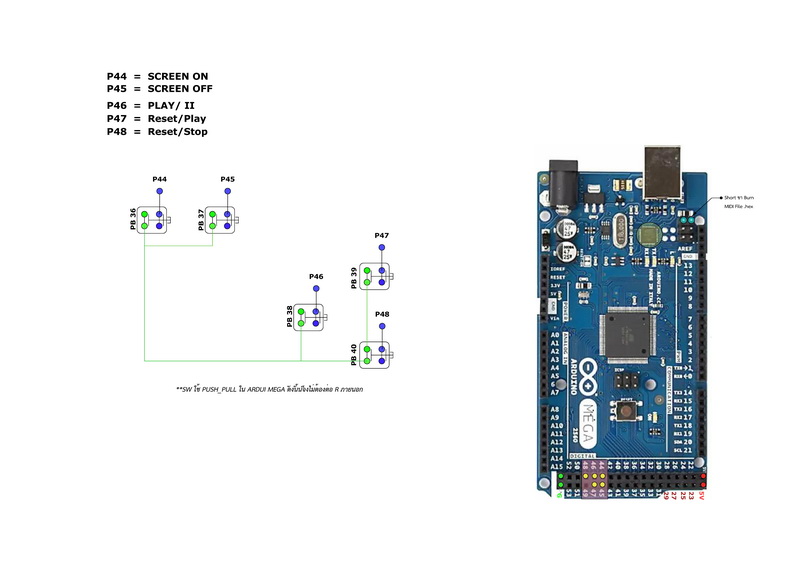
Diagram การต่อสาย
CODE
#define USE_ROTARY_ENCODER
#include <MIDI_Controller.h> // Include the library


#include <MIDI.h>
MIDI_CREATE_DEFAULT_INSTANCE();  //ตั้งค่า MIDI Libraly


//--- ปุ่มกด หลายตัว  ---------------------------------------------------------------------------

int mem[] = { 0, 0, 0, 0, 0, 0, 0, 0, 0, 0, 0, 0, 0, 0, 0, 0, 0, 0, 0, 0, 0, 0, 0, 0, 0, 0, 0, 0, 0, 0, 0, 0, 0, 0, 0, 0, 0, 0, 0, 0, 0, 0 }; //เก็บค่าสถานะปุ่มกดแต่ละตำแหน่งเอาไว้


//---------------------------------------------------------------------------------------------------------------------


//-------------- Rotary Encoder  ใช้ library  MIDI_Controller.h ---------------------------------------------------------
//Rotary Encoder #1
const uint8_t Channel = 1;       // MIDI channel 1
const uint8_t Controller = 0x14; // MIDI Control Change controller number
const int speedMultiply = 1;     // No change in speed of the encoder (number of steps is multiplied by 1)

//Rotary Encoder #2
const uint8_t Channel2 = 2;       // MIDI channel 1
const uint8_t Controller2 = 0x15; // MIDI Control Change controller number
const int speedMultiply2 = 1;     // No change in speed of the encoder (number of steps is multiplied by 1)


// Create a new instance of the class 'RotaryEncoder', called 'enc', on pin 2 and 3, controller number 0x14, on channel1,
// no change in speed (speed is multiplied by 1), it's used as a jog wheel, and the sign mode is set to two's complement.
//TWOS_COMPLEMENT, BINARY_OFFSET or SIGN_MAGNITUDE
//RotaryEncoder encoder(26, 27, Controller, Channel, speedMultiply, JOG, TWOS_COMPLEMENT);


//RotaryEncoder encoder(26, 27, Controller, Channel, speedMultiply, JOG and NORMAL_ENCODER,TWOS_COMPLEMENT&SIGN_MAGNITUDE);
//หลังจากใส่คาปาซิเตอร์  0.1 ไมโครฟารัดลงไปใน Rotary Encoder แล้วถ้าเลือกแบบนี้จังหวะการหมุนในการเลือกภาพเลื่อนไป 1 ช่องเท่ากับเลื่อน 2 ภาพ


//RotaryEncoder encoder(26, 27, Controller, Channel, speedMultiply,  NORMAL_ENCODER, TWOS_COMPLEMENT);
//RotaryEncoder encoder(26, 27, Controller, Channel, speedMultiply,  NORMAL_ENCODER, SIGN_MAGNITUDE)
//หลังจากใส่คาปาซิเตอร์  0.1 ไมโครฟารัดลงไปใน Rotary Encoder แล้วถ้าเลือกแบบนี้จังหวะการหมุนในการเลือกภาพเลื่อนไป 2 ช่องเท่ากับเลื่อน 1 ภาพ


//Rotary Encoder #1
RotaryEncoder encoder(26, 27, Controller, Channel, speedMultiply, NORMAL_ENCODER, TWOS_COMPLEMENT&SIGN_MAGNITUDE);
//หลังจากใส่คาปาซิเตอร์  0.1 ไมโครฟารัดลงไปใน Rotary Encoder แล้วถ้าเลือกแบบนี้จังหวะการหมุนในการเลือกภาพเลื่อนไป 2 ช่องเท่ากับเลื่อน 1 ภาพ
//ให้เข้าไปแก้จำนวนPluse ของ NORMAL_ENCODER จาก 4 Pluse  ต่อ 1 คลิกเป็น 2 Pluse ต่อ 1 คลิก ของไฟล์ RotaryEncoder.h
//ที่อยู่ C:\Users\PUYIOT\Documents\Arduino\libraries\MIDI_controller-master\src\MIDI_Outputs
// จากนั้นให้เปิดปิดโค้ชใหม่เพื่อล้างค่าและรับค่าการเปลี่ยนแปลงของ Pluse ที่เราเปลี่ยนใหม่ด้วย


//Rotary Encoder #2
RotaryEncoder encoder2(37, 38, Controller2, Channel2, speedMultiply2, NORMAL_ENCODER, TWOS_COMPLEMENT&SIGN_MAGNITUDE);
//หลังจากใส่คาปาซิเตอร์  0.1 ไมโครฟารัดลงไปใน Rotary Encoder แล้วถ้าเลือกแบบนี้จังหวะการหมุนในการเลือกภาพเลื่อนไป 2 ช่องเท่ากับเลื่อน 1 ภาพ
//ให้เข้าไปแก้จำนวนPluse ของ NORMAL_ENCODER จาก 4 Pluse  ต่อ 1 คลิกเป็น 2 Pluse ต่อ 1 คลิก ของไฟล์ RotaryEncoder.h
//ที่อยู่ C:\Users\PUYIOT\Documents\Arduino\libraries\MIDI_controller-master\src\MIDI_Outputs
// จากนั้นให้เปิดปิดโค้ชใหม่เพื่อล้างค่าและรับค่าการเปลี่ยนแปลงของ Pluse ที่เราเปลี่ยนใหม่ด้วย


;


//--- ปุ่ม potentiometer1 slide  ตัวที่ 1  ---------------------------------------------------------------------------
int val = 0;
int lastVal = 0;
Analog potentiometer1(A0, MIDI_CC::Channel_Volume, 1);

//---------------------------------------------------------------------------------------------------------------------


Analog potentiometer2(A1, MIDI_CC::Channel_Volume, 7);
Analog potentiometer3(A2, MIDI_CC::Channel_Volume, 8);
Analog potentiometer4(A3, MIDI_CC::Channel_Volume, 9);
Analog potentiometer5(A4, MIDI_CC::Channel_Volume, 10);


//************void setup   ******************
//*******************************************
void setup()

{


  Serial.begin(9600);
  MIDI.begin(MIDI_CHANNEL_OMNI);//ให้ Libraly MIDI เริ่มต้นทำงาน

  //กำหนดขาที่ใช้งานให้เป็นแบบ input pull up โดยใช้ R pull up ภายใน  arduino
  pinMode(2, INPUT_PULLUP ) ;
  pinMode(3, INPUT_PULLUP ) ;
  pinMode(4, INPUT_PULLUP ) ;
  pinMode(5, INPUT_PULLUP ) ;
  pinMode(6, INPUT_PULLUP ) ;
  pinMode(7, INPUT_PULLUP ) ;
  pinMode(8, INPUT_PULLUP ) ;
  pinMode(9, INPUT_PULLUP ) ;
  pinMode(10, INPUT_PULLUP ) ;
  pinMode(11, INPUT_PULLUP ) ;
  pinMode(12, INPUT_PULLUP ) ;
  pinMode(13, INPUT_PULLUP ) ;
  pinMode(14, INPUT_PULLUP ) ;
  pinMode(15, INPUT_PULLUP ) ;
  pinMode(16, INPUT_PULLUP ) ;
  pinMode(17, INPUT_PULLUP ) ;

  pinMode(18, INPUT_PULLUP ) ;
  pinMode(19, INPUT_PULLUP ) ;
  pinMode(20, INPUT_PULLUP ) ;
  pinMode(21, INPUT_PULLUP ) ;
  pinMode(22, INPUT_PULLUP ) ;
  pinMode(23, INPUT_PULLUP ) ;
  pinMode(24, INPUT_PULLUP ) ;
  pinMode(25, INPUT_PULLUP ) ;
  pinMode(28, INPUT_PULLUP ) ;
  pinMode(31, INPUT_PULLUP ) ;
  pinMode(29, INPUT_PULLUP ) ;//ปุ่มกด Encoder#1


  pinMode(30, INPUT_PULLUP ) ;//LOOP IN
  pinMode(32, INPUT_PULLUP ) ;//LOOP OUT
  pinMode(33, INPUT_PULLUP ) ;//PLAY/ II
  pinMode(34, INPUT_PULLUP ) ;//Reset/Play
  pinMode(35, INPUT_PULLUP ) ;//Reset/Stop
  pinMode(36, INPUT_PULLUP ) ;//ปุ่มกด Encoder#2


  pinMode(39, INPUT_PULLUP ) ;//Transition  Effect 1
  pinMode(40, INPUT_PULLUP ) ;//Transition  Effect 1
  pinMode(41, INPUT_PULLUP ) ;//Transition  Effect 1
  pinMode(42, INPUT_PULLUP ) ;//Transition  Effect 1
 // pinMode(43, INPUT_PULLUP ) ;//SET FADE


  pinMode(44, INPUT_PULLUP ) ;//SCREEN ON
  pinMode(45, INPUT_PULLUP ) ;//SCREEN OFF
  pinMode(46, INPUT_PULLUP ) ;//PLAY/ II
  pinMode(47, INPUT_PULLUP ) ;//Reset/Play
  pinMode(48, INPUT_PULLUP ) ;//Reset/Stop


}

//************ จบ void setup   **************


//************void loop   ********************************************************************************************
//********************************************************************************************************************
void loop() {

 MIDI.read();


  //------------------  สวิสทซ์ ปุ่มกด  16 ตัว แสดง ON OFF ใน โปรแกรม MIDI  -------------------------------------------------
  //อ่านปุ่มทุกปุ่มออกมา
  int sensorVal[] = {
    !digitalRead(2), !digitalRead(3),
    !digitalRead(4), !digitalRead(5),
    !digitalRead(6), !digitalRead(7),
    !digitalRead(8), !digitalRead(9),
    !digitalRead(10), !digitalRead(11),
    !digitalRead(12), !digitalRead(13),
    !digitalRead(14), !digitalRead(15),
    !digitalRead(16), !digitalRead(17),

    !digitalRead(18), !digitalRead(19),
    !digitalRead(20), !digitalRead(21),
    !digitalRead(22), !digitalRead(23),
    !digitalRead(24), !digitalRead(25),
    !digitalRead(28), !digitalRead(31),
    !digitalRead(29),

    !digitalRead(30), !digitalRead(32),
    !digitalRead(33), !digitalRead(34),
    !digitalRead(35), !digitalRead(36),


    !digitalRead(39), !digitalRead(40),
    !digitalRead(41), !digitalRead(42),


    !digitalRead(44), !digitalRead(45),
    !digitalRead(46), !digitalRead(47),
    !digitalRead(48)


  };

  //ถ้าสถานะปุ่มมีการเปลี่ยนแปลง
  for (int j = 0; j < 42; j++) {
    if (sensorVal[j]  != mem[j]) {
      mem[j] = sensorVal[j];
      // จะมีการส่ง MIDI Even ออกไป
      if (mem[j]) {
        MIDI.sendNoteOn(j + 51, 64, 1);
      } else {
        MIDI.sendNoteOff(j + 1, 64, 1);

      }
    }


    MIDI_Controller.refresh(); //ฟังก์ชันของ Rotary Encoder


  }

  //---------------------------------------------------------------------------------------------------------------------


}

//************************************************ จบ void loop   ********************************************************
//************************************************************************************************************************
ผมอธิบายไม่เก่งนะครับ แต่อยากจะนำเสนอให้ทุกท่านที่ สนใจ ได้ดูรายละเอียดกัน