#define BLYNK_PRINT Serial1
#include <BlynkSimpleStream.h>
#include <DHT.h>
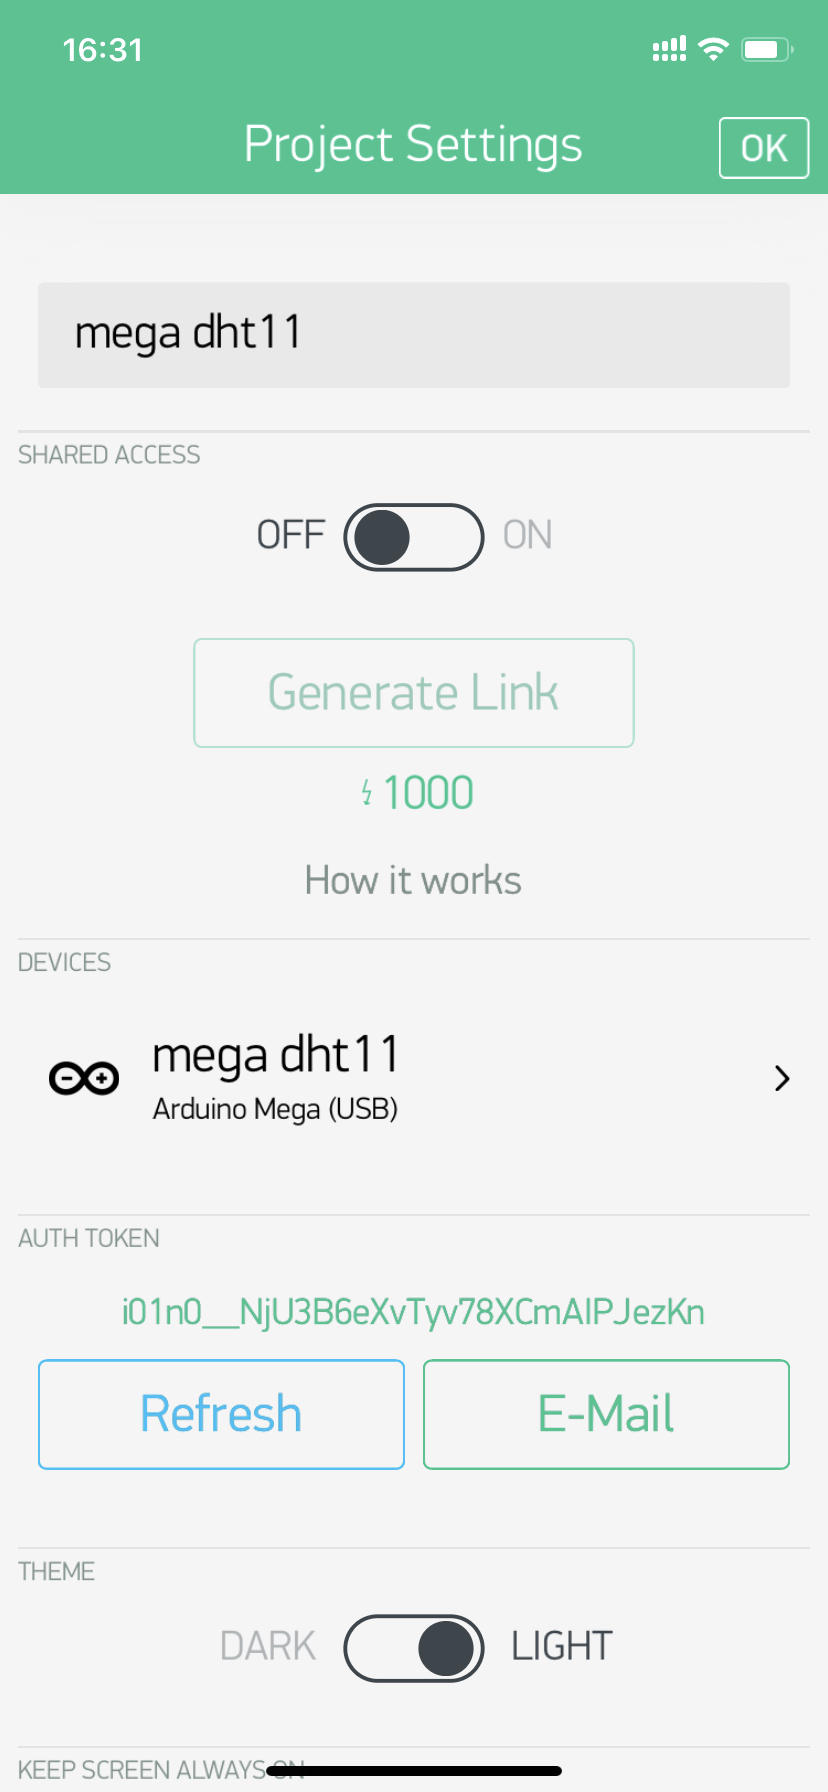
// You should get Auth Token in the Blynk App.
// Go to the Project Settings (nut icon).
char auth[] = "i01n0__NjU3B6eXvTyv78XCmAIPJezKn";
#define DHTPIN 2 // What digital pin we're connected to
// Uncomment whatever type you're using!
#define DHTTYPE DHT11 // DHT 11
//#define DHTTYPE DHT22 // DHT 22, AM2302, AM2321
//#define DHTTYPE DHT21 // DHT 21, AM2301
DHT dht(DHTPIN, DHTTYPE);
BlynkTimer timer;
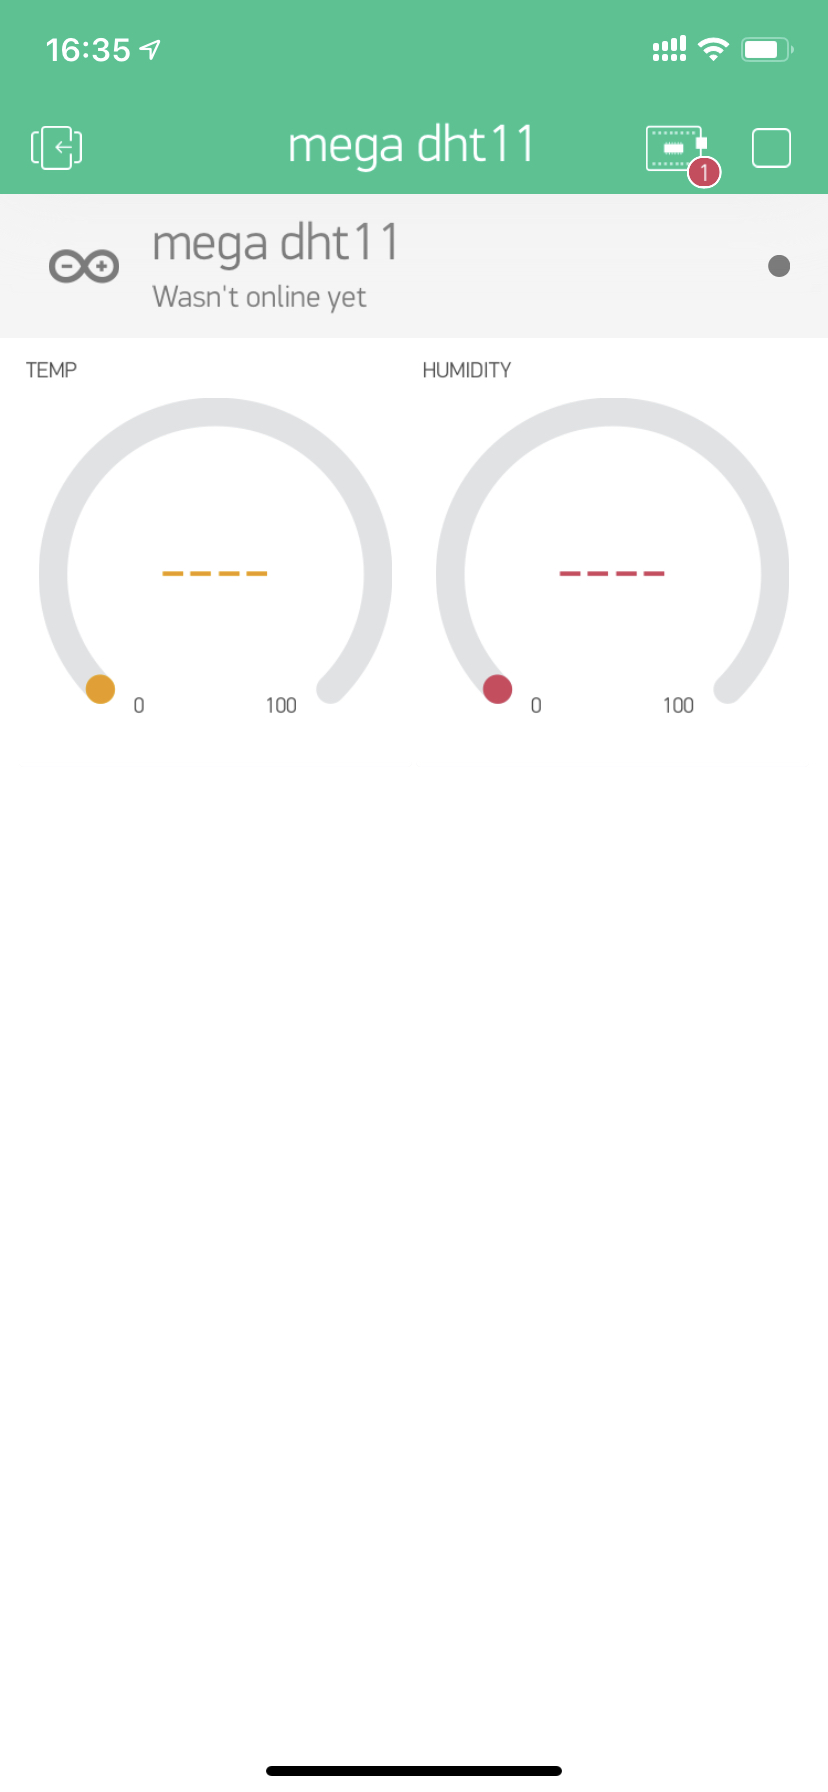
// This function sends Arduino's up time every second to Virtual Pin (5).
// In the app, Widget's reading frequency should be set to PUSH. This means
// that you define how often to send data to Blynk App.
void sendSensor()
{
float h = dht.readHumidity();
float t = dht.readTemperature(); // or dht.readTemperature(true) for Fahrenheit
if (isnan(h) || isnan(t)) {
Serial1.println("Failed to read from DHT sensor!");
return;
}
// You can send any value at any time.
// Please don't send more that 10 values per second.
Blynk.virtualWrite(V5, h);
Blynk.virtualWrite(V6, t);
}
void setup()
{
// Debug console
Serial1.begin(9600);
// Blynk will work through Serial
// Do not read or write this serial manually in your sketch
Serial.begin(9600);
Blynk.begin(Serial, auth);
dht.begin();
// Setup a function to be called every second
timer.setInterval(1000L, sendSensor);
}
void loop()
{
Blynk.run();
timer.run();
}
#define BLYNK_PRINT Serial1

#include <BlynkSimpleStream.h>
#include <DHT.h>

// You should get Auth Token in the Blynk App.
// Go to the Project Settings (nut icon).
char auth[] = "i01n0__NjU3B6eXvTyv78XCmAIPJezKn";

#define DHTPIN 2          // What digital pin we're connected to

// Uncomment whatever type you're using!
#define DHTTYPE DHT11     // DHT 11
//#define DHTTYPE DHT22   // DHT 22, AM2302, AM2321
//#define DHTTYPE DHT21   // DHT 21, AM2301

DHT dht(DHTPIN, DHTTYPE);
BlynkTimer timer;

// This function sends Arduino's up time every second to Virtual Pin (5).
// In the app, Widget's reading frequency should be set to PUSH. This means
// that you define how often to send data to Blynk App.
void sendSensor()
{
  float h = dht.readHumidity();
  float t = dht.readTemperature(); // or dht.readTemperature(true) for Fahrenheit

  if (isnan(h) || isnan(t)) {
    Serial1.println("Failed to read from DHT sensor!");
    return;
  }
  // You can send any value at any time.
  // Please don't send more that 10 values per second.
  Blynk.virtualWrite(V5, h);
  Blynk.virtualWrite(V6, t);
}

void setup()
{
  // Debug console
  Serial1.begin(9600);

  // Blynk will work through Serial
  // Do not read or write this serial manually in your sketch
  Serial.begin(9600);
  WiFi.begin(ssid, pass); //เชื่อมต่อ WiFi
  Blynk.config(auth, "blynk.iot-cm.com", "8080"); //กำหนด Token key , ชื่อ Server และ port
  Blynk.connect(); //เชื่อมต่อไปยัง Blynk

  dht.begin();

  // Setup a function to be called every second
  timer.setInterval(1000L, sendSensor);
}

void loop()
{
  Blynk.run();
  timer.run();
}
โค้ตเดิมผิด
Blynk.begin(Serial, auth);
ปัญหาคือเราใช้คำสั่งไปยัง blynk หลักครับ ต้องกำหนดเอง ด้วย คำสั่งนี้
Blynk.config(auth, "blynk.iot-cm.com", "8080"); //กำหนด Token key , ชื่อ Server และ port
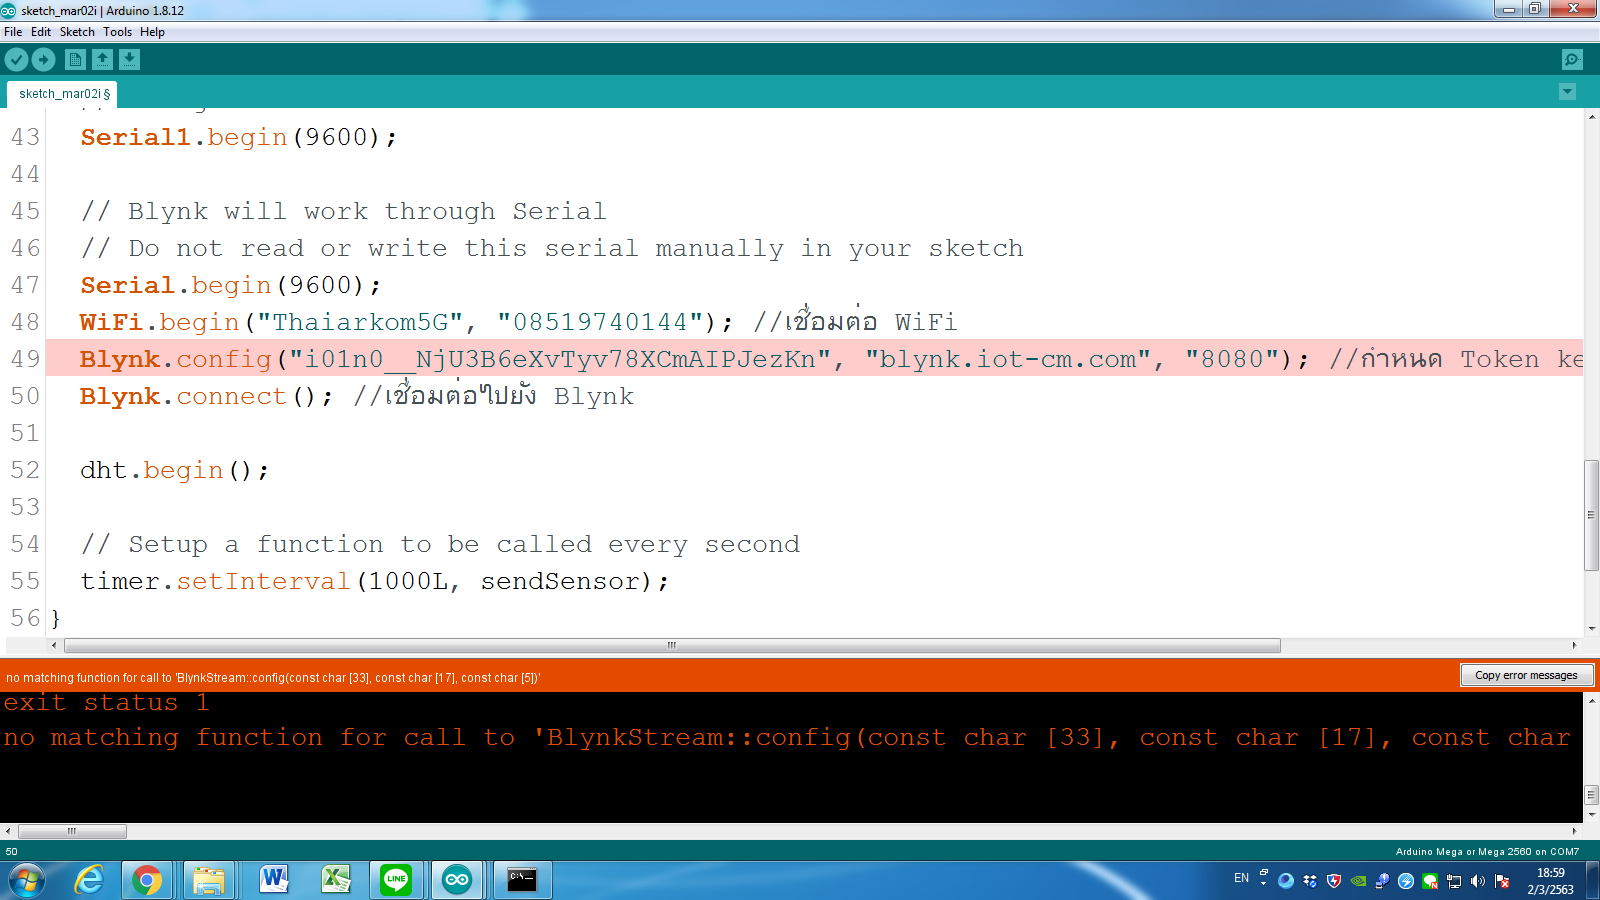
เปลี่ยนเป็น
Blynk.config(auth, "blynk.iot-cm.com", 8080);

วางโค้ตล่าสุดเต็มๆ หน่อยครับ
วางแบบนี้ครับ
#define BLYNK_PRINT Serial1

#include <BlynkSimpleStream.h>
#include <DHT.h>

// You should get Auth Token in the Blynk App.
// Go to the Project Settings (nut icon).
char auth[] = "i01n0__NjU3B6eXvTyv78XCmAIPJezKn";

#define DHTPIN 2          // What digital pin we're connected to

// Uncomment whatever type you're using!
#define DHTTYPE DHT11     // DHT 11
//#define DHTTYPE DHT22   // DHT 22, AM2302, AM2321
//#define DHTTYPE DHT21   // DHT 21, AM2301

DHT dht(DHTPIN, DHTTYPE);
BlynkTimer timer;

// This function sends Arduino's up time every second to Virtual Pin (5).
// In the app, Widget's reading frequency should be set to PUSH. This means
// that you define how often to send data to Blynk App.
void sendSensor()
{
  float h = dht.readHumidity();
  float t = dht.readTemperature(); // or dht.readTemperature(true) for Fahrenheit

  if (isnan(h) || isnan(t)) {
    Serial1.println("Failed to read from DHT sensor!");
    return;
  }
  // You can send any value at any time.
  // Please don't send more that 10 values per second.
  Blynk.virtualWrite(V5, h);
  Blynk.virtualWrite(V6, t);
}

void setup()
{
  // Debug console
  Serial1.begin(9600);

  // Blynk will work through Serial
  // Do not read or write this serial manually in your sketch
  Serial.begin(9600);
  WiFi.begin(ssid, pass); //เชื่อมต่อ WiFi
  Blynk.config(auth, "blynk.iot-cm.com", "8080"); //กำหนด Token key , ชื่อ Server และ port
  Blynk.connect(); //เชื่อมต่อไปยัง Blynk

  dht.begin();

  // Setup a function to be called every second
  timer.setInterval(1000L, sendSensor);
}

void loop()
{
  Blynk.run();
  timer.run();
}
#define BLYNK_PRINT Serial1
#include <BlynkSimpleStream.h>
#include <DHT.h>
#include <WiFi.h>
// You should get Auth Token in the Blynk App.
// Go to the Project Settings (nut icon).
char auth[] = "i01n0__NjU3B6eXvTyv78XCmAIPJezKn";
#define DHTPIN 2 // What digital pin we're connected to
// Uncomment whatever type you're using!
#define DHTTYPE DHT11 // DHT 11
//#define DHTTYPE DHT22 // DHT 22, AM2302, AM2321
//#define DHTTYPE DHT21 // DHT 21, AM2301
DHT dht(DHTPIN, DHTTYPE);
BlynkTimer timer;
// This function sends Arduino's up time every second to Virtual Pin (5).
// In the app, Widget's reading frequency should be set to PUSH. This means
// that you define how often to send data to Blynk App.
void sendSensor()
{
float h = dht.readHumidity();
float t = dht.readTemperature(); // or dht.readTemperature(true) for Fahrenheit
if (isnan(h) || isnan(t)) {
Serial1.println("Failed to read from DHT sensor!");
return;
}
// You can send any value at any time.
// Please don't send more that 10 values per second.
Blynk.virtualWrite(V5, h);
Blynk.virtualWrite(V6, t);
}
void setup()
{
// Debug console
Serial1.begin(9600);
// Blynk will work through Serial
// Do not read or write this serial manually in your sketch
Serial.begin(9600);
WiFi.begin("Thaiarkom5G", "08519740144"); //เชื่อมต่อ WiFi
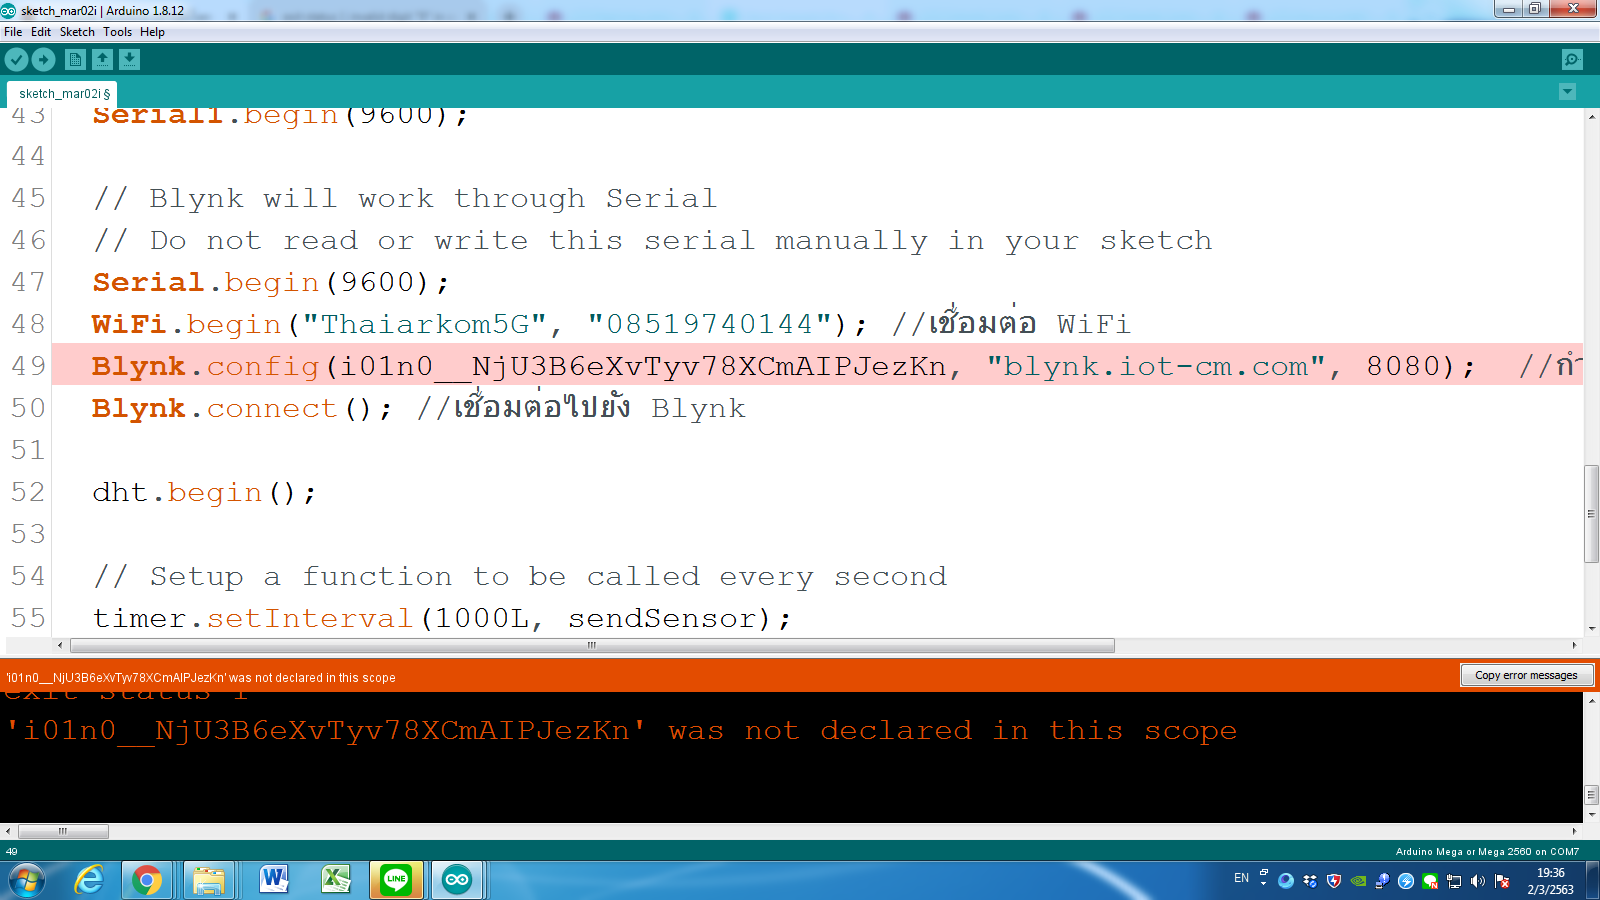
Blynk.config(i01n0__NjU3B6eXvTyv78XCmAIPJezKn, "blynk.iot-cm.com", 8080); //กำหนด Token key , ชื่อ Server และ port
Blynk.connect(); //เชื่อมต่อไปยัง Blynk
dht.begin();
// Setup a function to be called every second
timer.setInterval(1000L, sendSensor);
}
void loop()
{
Blynk.run();
timer.run();
}
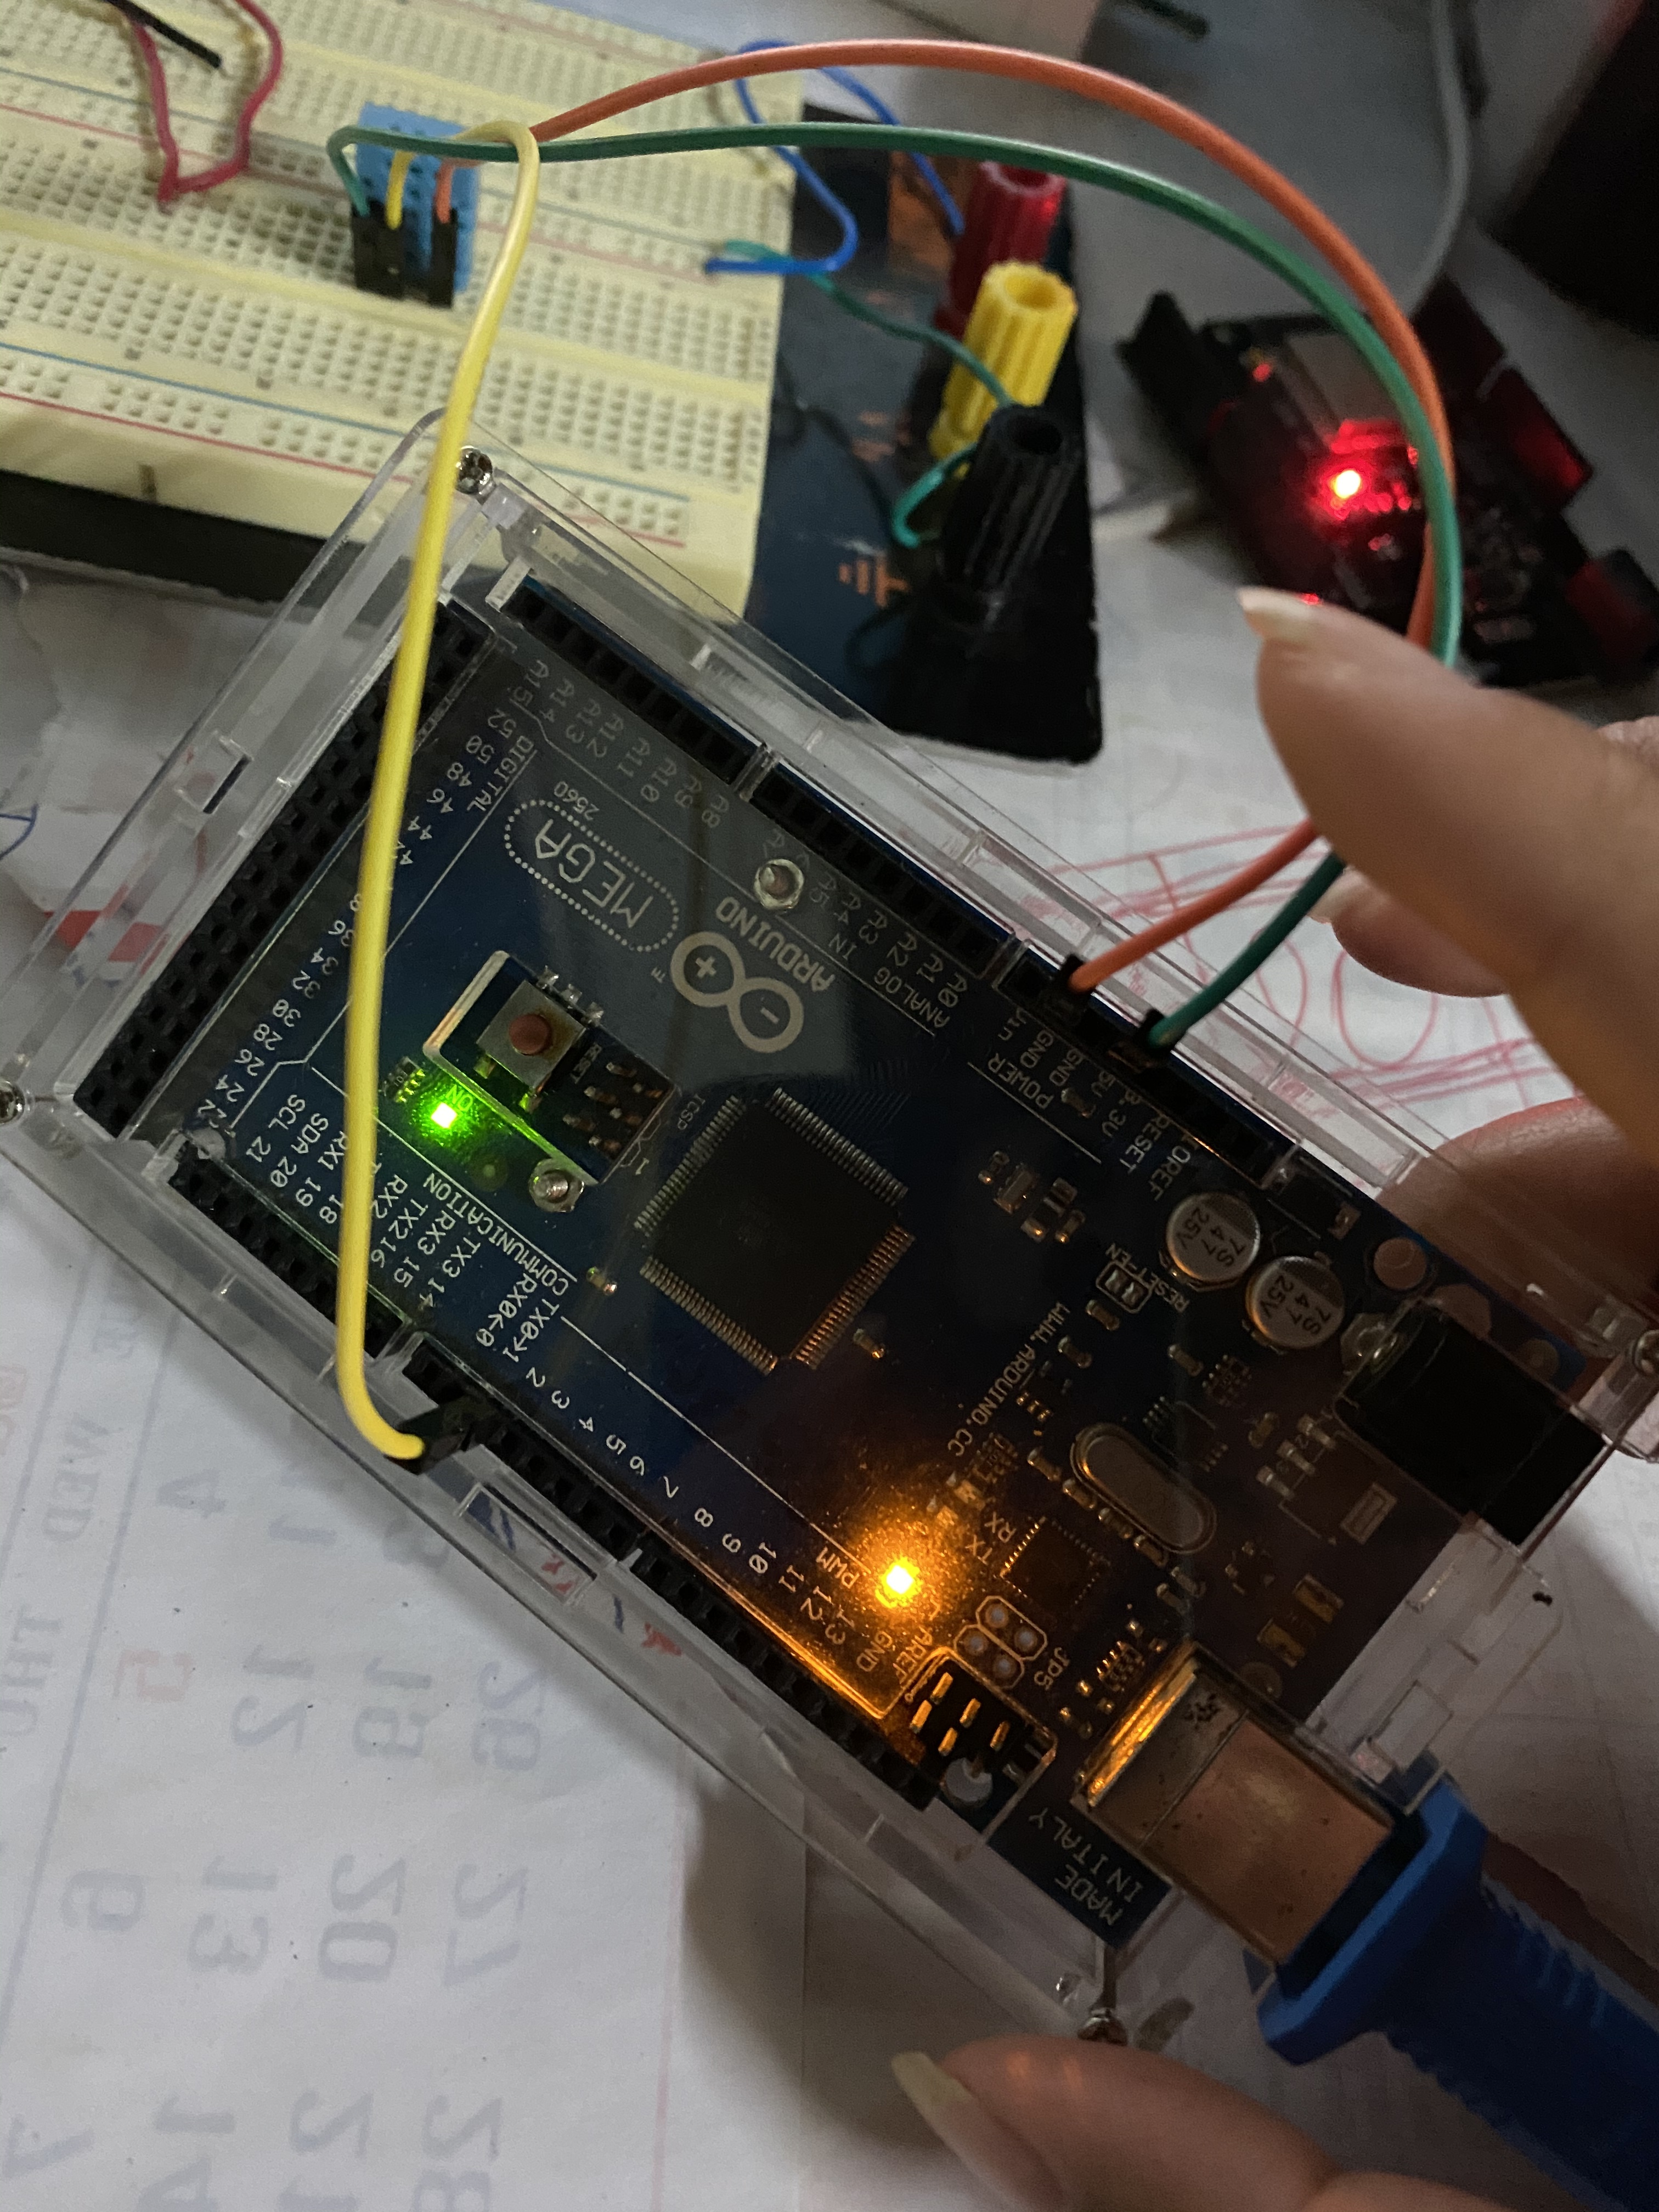
ใช้บอร์ดอะไรครับ ถ่ายมาดูหน่อย
ใช้ระบบ lan ต่อเน็ตหรอครับ
ทำไมถึงต้องเลือกใช้ BlynkSimpleStream.h
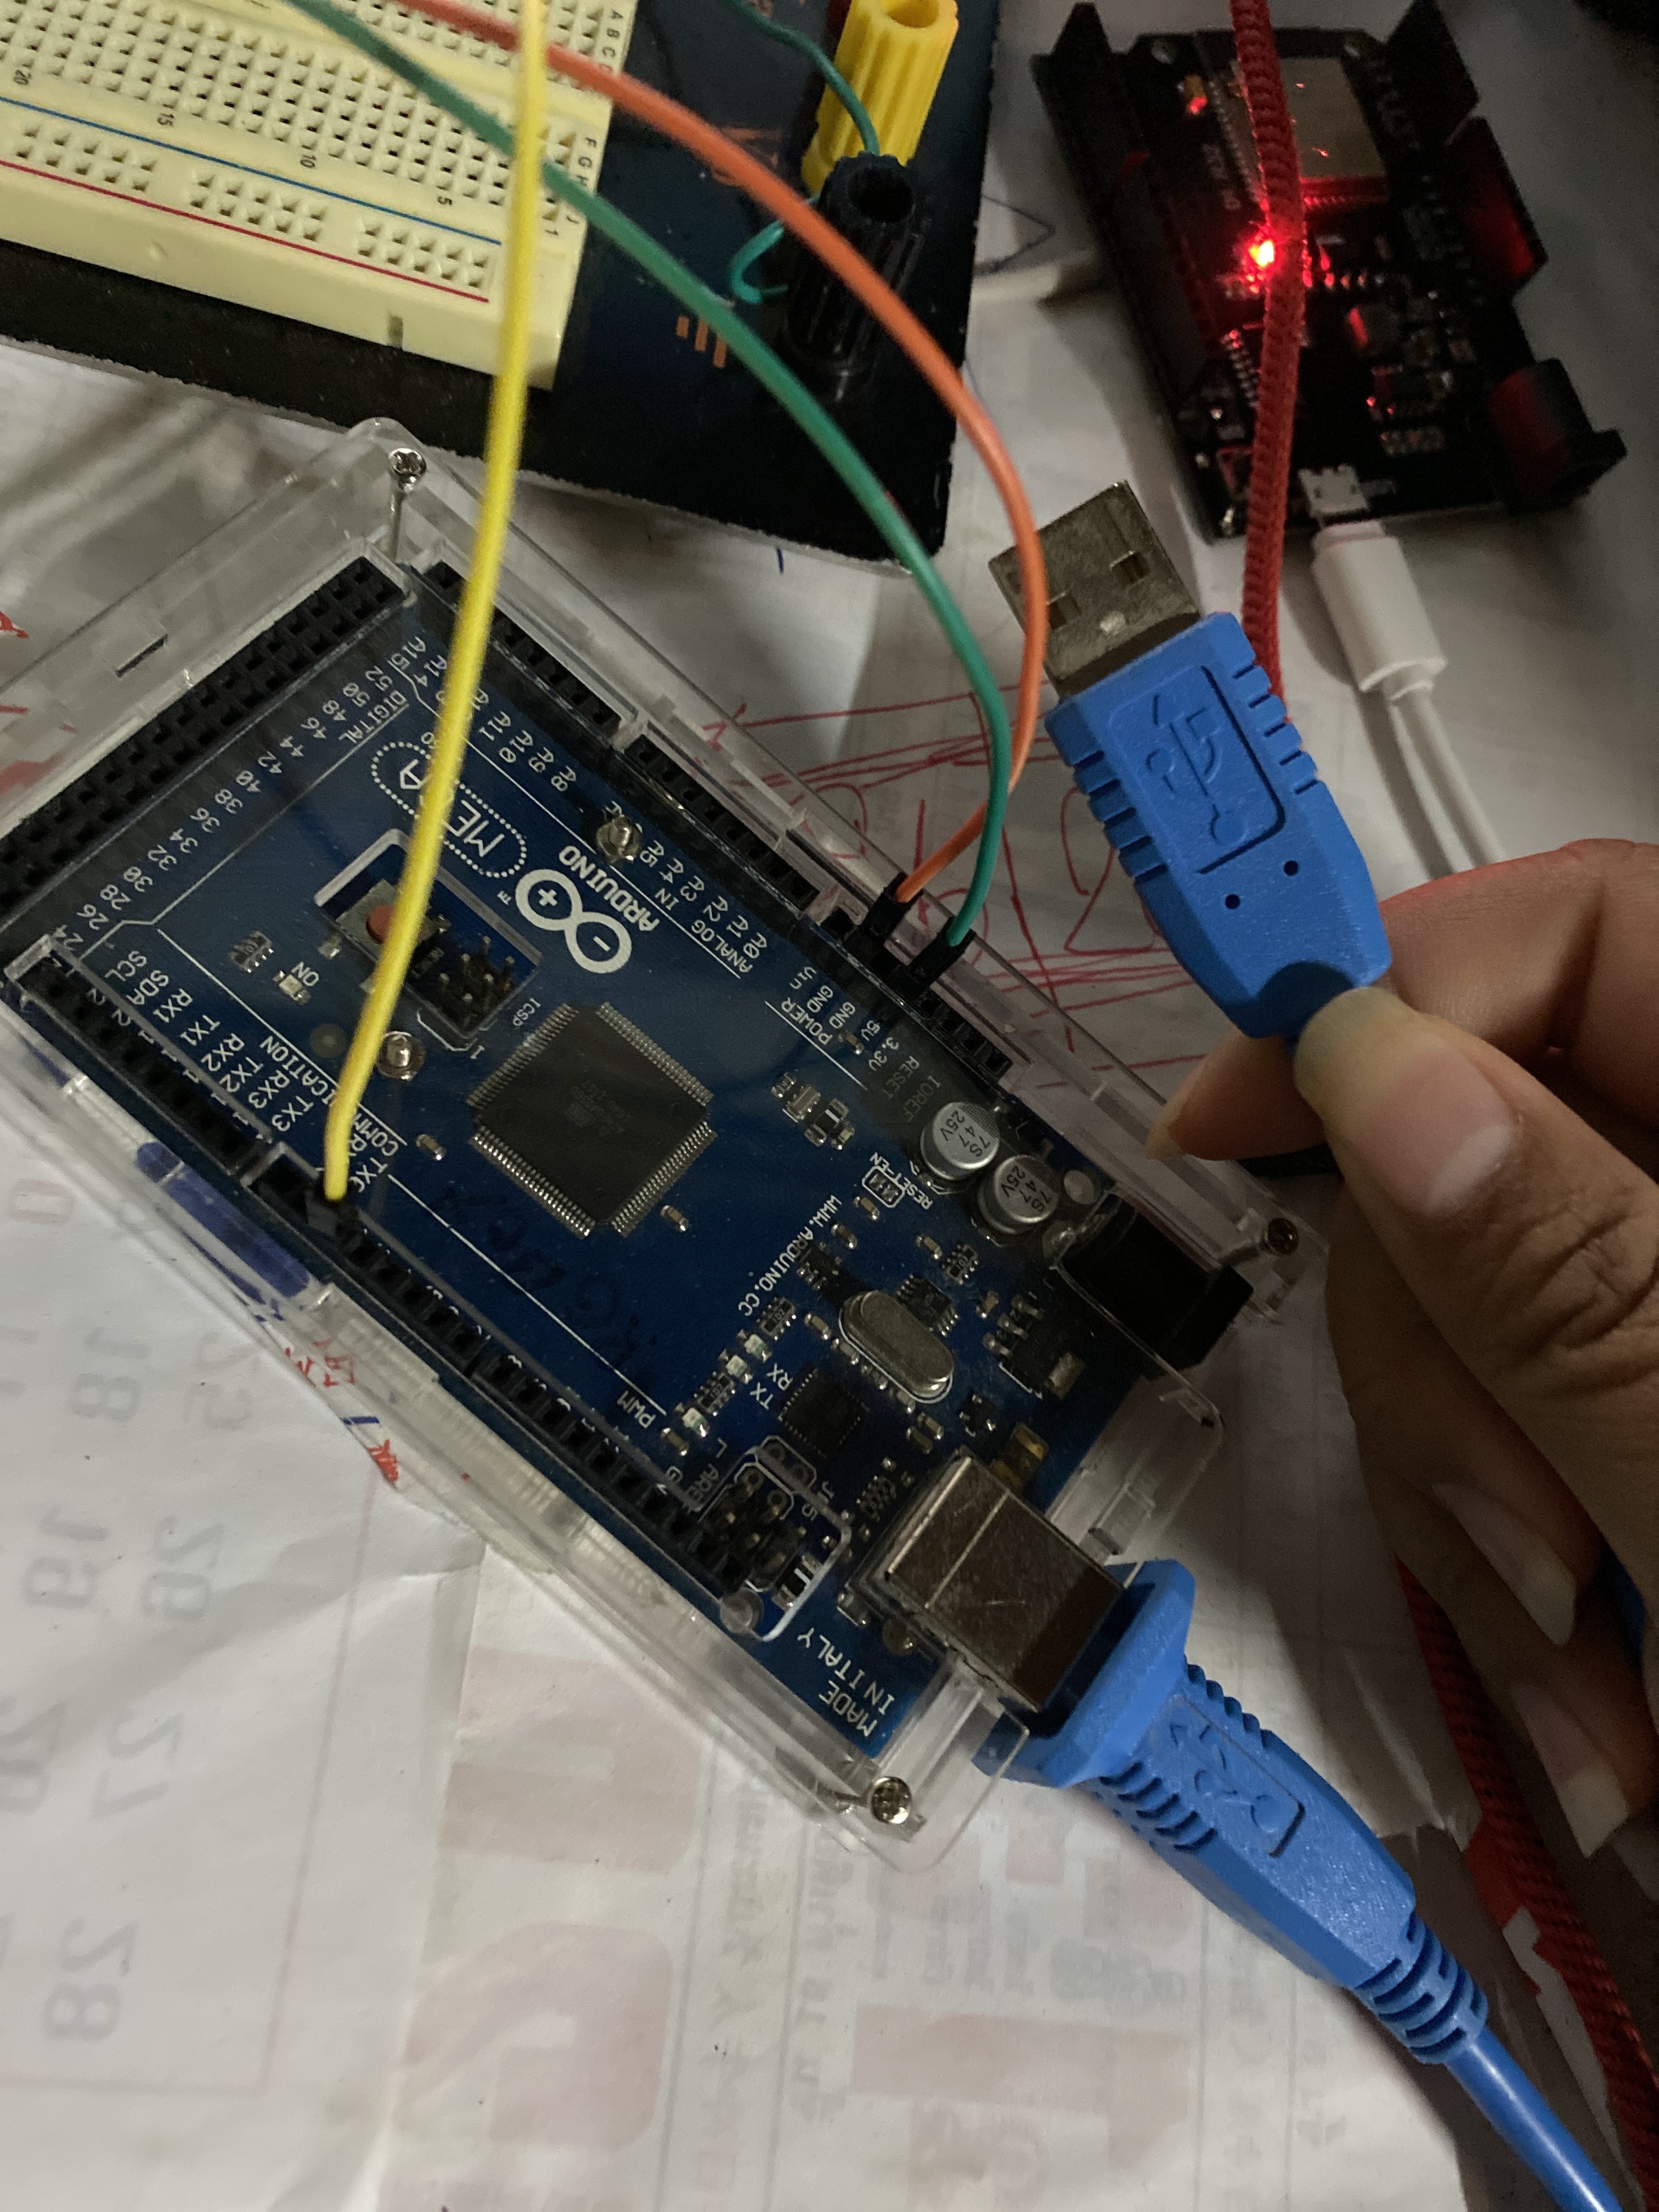
รู้สึกว่า สเปค Arduino MEGA ตัวนี้จะไม่มี wifi ในตัวมาด้วยรึป่าวครับ
ใช่ค่ะ ก็เลย งงว่าพี่ให้ใช้ WiFi ทำไม กะว่าจะถามตั้งเเต่เเรกเเล้ว เเต่ก็กลัวว่าตัวเอง ไม่เข้าใจอะไรรึป่าว ยังไม่ค่อยเข้าใจ โคดเท่าไหร่
จริงๆ เราควรบอกสเปค บอร์ดที่ใช้มาให้ด้วยนะครับ เพราะห์เวลาวิเคราะห์ บอร์ดคนละตัวก็จะไปคลละคำตอบ
ค่ะ ขอโทษทีนะคะ
ถ้าจะเชื่อม blynk แบบ wifi ต้องต่อลักษณะนี้ครับ
ทำไมถึงเลือกใช้ ไลบารี่ตัวนี้ครับ แล้วโจทย์ของโปรเจ็คนี้คืออะไร ? ต้องการเชื่อมต่อกับ blynk ยังไง
